
Setting up a send-only mail server with Postfix
Introduction
As I’ve mentioned in my First Blog Post, setting up a mail server is optional but recommended to monitor events and security incidents in our server. In this article, I’ll show you how to install and setup Postfix as a send-only SMTP server for Ubuntu servers.
Prerequisites
- An Ubuntu Server.
- A valid domain name, for e.g, example.com, with a DNS A record pointing to your server. You also need to set Reverse DNS(rDNS) which resolves an IP address to a FQDN. Reverse DNS uses a PTR record to match an IP address with a domain name. Some SMTP servers reject a mail if it’s originating server’s IP address does not have a PTR record.
- Port 25 should be open to send mails. Most ISPs, Hosting providers and cloud service providers block outbound connection on port 25 to reduce spam and malicious activity. If it is not open, make sure you check it with your service provider and ask them to open it.
Step 1: Setup the Server hostname
For postfix to send mails, the server hostname must be set to match the domain name pointing to your server. You can change your server hostname with the following command:-
hostnamectl set-hostname example.com
Here, example.com is your domain name. Next use the hostname command to check whether your server hostname got updated or not.
Step 2: Install Postfix
To install Postfix, use the following command:-
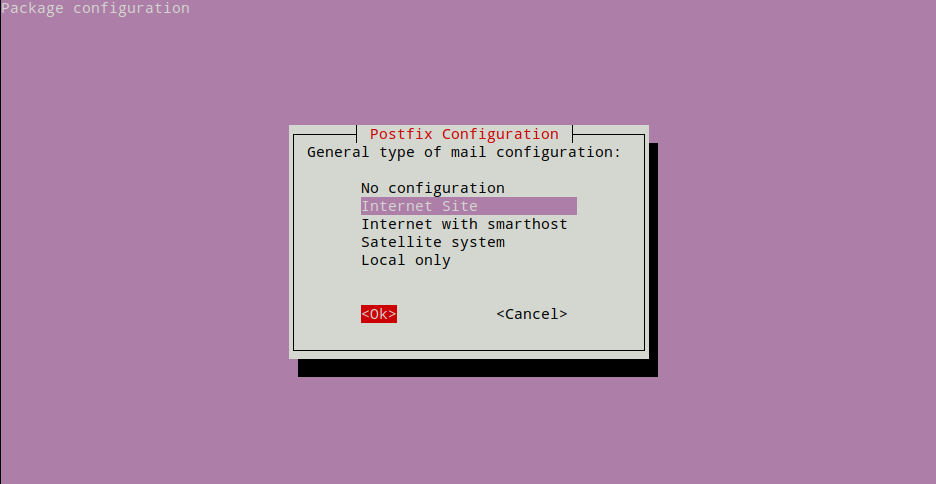
apt-get update && apt-get install -y postfixAt the end of installation, dpkg will prompt you to configure postfix. Choose Internet Site when prompted to choose a option from “General type of mail configuration” and then press the tab key and then hit enter.
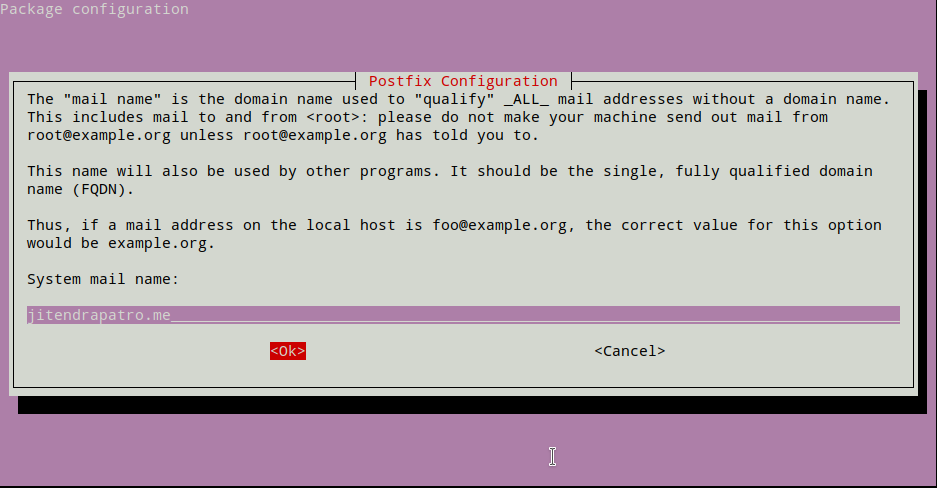
Next for “System mail name” enter your server hostname you set in Step 1. Press tab and then enter.
Leave the next configurations at default.
Step 3: Configure Postfix
To use postfix as a send-only mail server we need to edit /etc/postfix/main.cf postfix configuration file. Open the file using your favourite text editor. Here I used nano.
nano /etc/postfix/main.cfNext, scroll down and look for inet_interfaces setting. It should be something like the image below.

Change the value
inet_interfaces = allto:-
inet_interfaces = loopback-only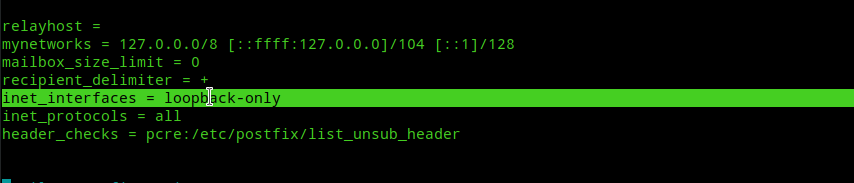
Step 4: Enable TLS for outgoing mails
By default TLS parameters are enabled for postfix. To confirm, check whether the following line is uncommented in /etc/postfix/main.cf:-
smtpd_tls_security_level=mayYou don’t need to set up ssl certificates for a postfix send-only mail server as explained in postfix official docs. You can get more info about the above setting from this postfix official guide.
Step 5: Save configuration and Test!
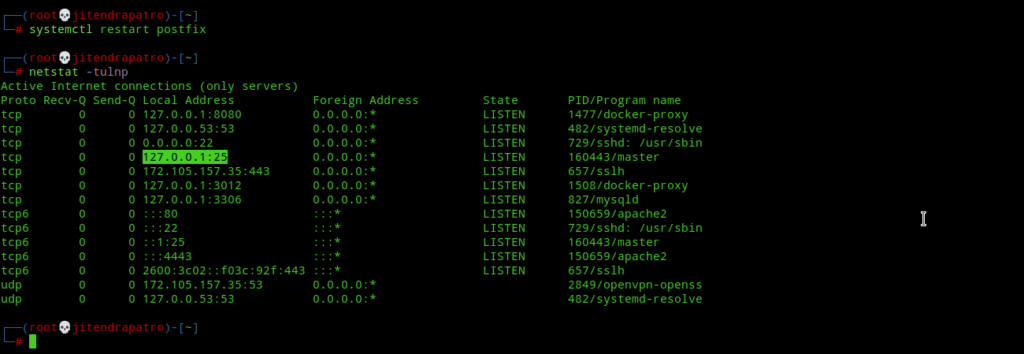
For the configuration changes to take effect use the following command:-
systemctl restart postfixNext, port 25 must be open on your server and postfix should be listening on localhost.
Now, send a test email to you own mail account.
echo "test test" | mail -s "test" yourmail@mailname.comAt this point a few things can happen to your mail. For instance,
- Your mail may end up in the spam folder of your mail account.
- Your mail not get send due to port 25 being blocked by your ISP/Service Provider.
- Your mail may get rejected by the receiving mail provider’s(like gmail, outlook etc.) SMTP servers if your IP address is in their spam/block list and may never reach your mail account.
If the first option is your case, then you’ve to configure SPF, DKIM and DMARC records for your mail server. This will increase the chances of mail deliverability directly into recipient’s inbox. Explaining how to setup SPF, DKIM and DMARC will take another additional post as I mentioned in my First Blog Post.
If the second option is your case, then make sure you consult with your ISP/Service Provider to unblock port 25 so that you can send emails.
If the third one is your case, then you’ve to contact with the respective mail provider’s support team to unblock you IP address from their spam list. For e.g, my own IP address was blocked by Outlook SMTP server protection and I’ve had to join their program to unblock my IP address.
I’ve already configured SPF, DKIM and DMARC records for my server and I get a 10/10 score in mail-tester.com’s mail deliverability testing.

Conclusion
Under normal circumstances, like sending mails for cron jobs/event alerts from your server, the above configuration will be enough if you can whitelist your server’s mails in your personal mail account’s spam list. At this point all will be good unless your mail gets blocked due to one of the other two reasons I mentioned above. If that’s the case, then do as I said and all will be fine.:)