Migrating Rootful Docker containers to Rootless Docker
Introduction
Rootless mode of docker allows a non-root user to run Docker daemon and containers. This helps in preventing potential vulnerabilities, like privilege escalation to root, in the Docker daemon and the container runtime. The best thing about rootless docker is that any user can install the Docker daemon without sudo(root) privileges. According to Docker docs,
Rootless mode does not use binaries with
SourceSETUIDbits or file capabilities, exceptnewuidmapandnewgidmap, which are needed to allow multiple UIDs/GIDs to be used in the user namespace.
Table of Contents
- Prerequisites
- Install packages and create a rootless docker user
- Login to rootless user account
- Install rootless Docker
- Usage
- Uninstall rootless Docker
- Upgrading rootless Docker
- Conclusion
Prerequisites
- An Ubuntu Server running latest kernel. Ubuntu kernel is recommended by Docker as it has
overlay2storage driver support and enabled by default which is required for rootless mode. uidmappackage which containsnewuidmapandnewgidmapprograms required for rootless docker.dbus-user-sessionpackage which helps in maintaining user sessions until all login sessions of a user has ended. For more info visit this link.docker-ce-rootless-extraspackage in casedockerd-rootless-setuptool.shis not present in/usr/bin.- Optional but recommended, install the
systemd-containerpackage which provides systemd’s tools for container management.
Install packages and create a rootless docker user
First start with installing the prereqs with the following command as root user:-
apt-get install uidmap dbus-user-session systemd-container docker-ce-rootless-extrasNext, stop and disable the system-wide rootful Docker daemon(if it is already running).
systemctl stop docker.socket docker.service
systemctl disable --now docker.socket docker.service
Next, remove the rootful Docker socket file /var/run/docker.sock as we no longer need it.
rm /var/run/docker.sockNext, create a regular user without sudo privileges.
useradd -m -d /home/rootless -s $(which bash) rootlessNote:- I used the useradd command instead of adduser as it gives us fine-grained control over what privileges we want to give to the user. This also helps in creating a user account without a password which will prevent anybody(except root) to su or ssh into that user account. Remember, least privileges.
Login to rootless user account
The next step is important. Next, you must login into the rootless account(created above) using pam_systemd to follow the rest of the guide. This step is important because it helps to automatically create the XDG_RUNTIME_DIR environment variable and sets it to /run/user/$UID and also automatically cleans up on logout(I learned this the hard way.:)). You can get more info from here. TL;DR, if you didn’t use pam_systemd to login, then things will break and you’ll soon find yourself chasing bugs.:) Instead of logging in with sudo or su, you can log in using pam_systemd with one of the following ways:-
- Through GUI access. (I’ve a headless server :P)
- Through
ssh rootless@localhost(Remember, we’ve not set a password. :P) - Through
machinectl shell rootless@(Themachinectlprogram is included in thesystemd-containerpackage we installed above and this is the method we’re going to use to login as rootless. Yay!)
Next, login into the rootless account we created using the following command:-
machinectl shell rootless@
Install rootless Docker
Next, install rootless docker with the following command:-
dockerd-rootless-setuptool.sh install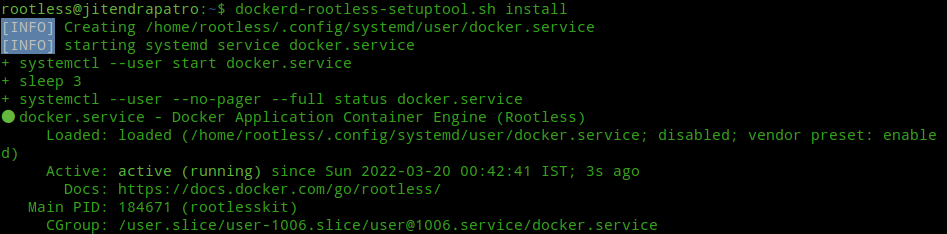
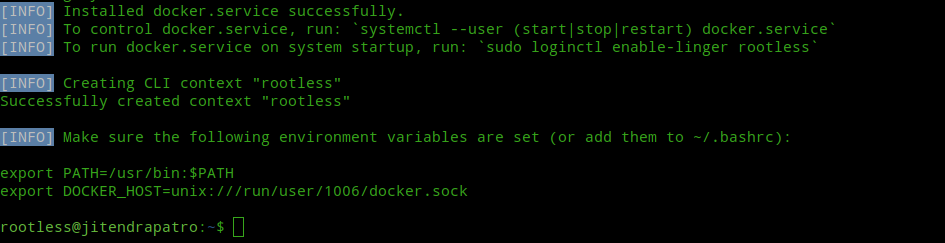
Next, append the environment variables given at the end of the successful installation to your ~/.bashrc file. Now, you can either logout and log back in or you can use “source ~/.bashrc” command to immediately apply the changes without logging out.
source ~/.bashrcUsage
After installation you can start the Docker daemon with the following command:-
systemctl --user start dockerNext, enable the docker service to start at system startup with the following command:-
systemctl --user enable docker
The rootless Docker daemon doesn’t starts automatically. To start it automatically you need to enable lingering. According to loginctl manpage lingering means,
enable-linger [USER...], disable-linger [USER...]
           Enable/disable user lingering for one or more users. If enabled for a specific user, a
           user manager is spawned for the user at boot and kept around after logouts. This allows
           users who are not logged in to run long-running services. Takes one or more user names or
           numeric UIDs as argument. If no argument is specified, enables/disables lingering for the
           user of the session of the caller.
You can enable lingering with the following command:-
loginctl enable-linger $(whoami)Next, use the following command to check whether it says “Linger=yes” at the end.
loginctl show-user $(whoami)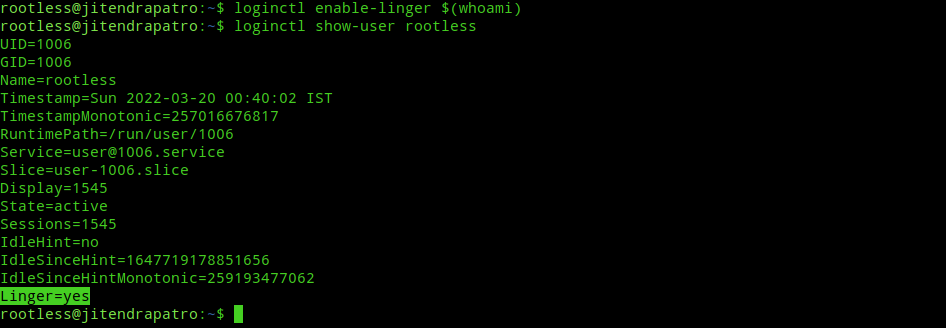
At this point you can start all your docker containers normally using docker command. Also, one thing to note is I’ve faced some bugs in my containers when I first started them under rootless mode and after some troubleshooting I found out that the reason is because I didn’t stop and remove my previous containers started under rootful mode. Hope this tip helps you out.
Uninstall rootless Docker
Uninstalling rootless docker is pretty easy. Just run the following commands serially one by one(Note, you’ll be exited from shell of rootless user):-
systemctl --user stop docker.service
systemctl --user disable docker.service
exit
killall -u rootless
userdel -rf rootless
Upgrading Rootless Docker
Currently there is no official way on how to do unattended-upgrades of rootless docker installations, which means unless you download the latest installation script and re-run it your docker won’t be updated to the latest version. So, after searching a bit online and putting everything together I came with this script for updating to latest rootless docker:-
#!/bin/bash

# Note:- pkill uses pgrep for process selection. If you've custom processes running with the word "docker" in them, it'll kill them. In that case uncomment the next line.
#/usr/bin/systemctl --user stop docker.service
pkill docker

# download rootless install script.
wget https://get.docker.com/rootless -O ~/rootless.sh

# env variables for above script
SKIP_IPTABLES=1
FORCE_ROOTLESS_INSTALL=1

# remove "Already installed verification" inside script.
sed -i 's#\-x\ \"\$BIN/\$DAEMON\"#\!\ \-x\ \"\$BIN/\$DAEMON\"#g' ~/rootless.sh

# execute the script.
/bin/bash ~/rootless.sh
Run the above script using the rootless user and it will work for docker run commands and you can add this as a cron job if you want. For people using docker-compose refer to this answer from docker forums upon which the above script is based.
And, that’s all for today. Hope you manage to migrate your containers to rootless mode.
Conclusion
If you’re a security conscious SysAdmin, then you should migrate your docker containers to rootless mode as soon as possible. While, this guide doesn’t adheres to the “Best practices” as mentioned in Docker docs, in my opinion this is the easiest way to migrate docker containers to rootless mode without any errors/issues in a “production environment”, i.e., if you strictly follow my guide. I migrated my own docker containers to rootless mode and after a fair amount of troubleshooting, I was able to successfully install rootless docker by following the above steps. If you still get any errors, then check the error in troubleshooting section of official Docker guide and if that didn’t help, then feel free to hit me up in the comments.
Thanks for reading. Stay secure, stay safe.