
OWASP Android UnCrackable Level 2
This is my second blog post related to Android Security. I recommend reading my first blog post in this category to understand some of the concepts I’m going to use in this blog post. In addition to MobSF we’ll be using Ghidra to solve this challenge. The Android UnCrackable Level 2 is similar to the first one, except the string comparison is done inside a native library and we’ve to reverse engineer the library in order to get our decrypted string. So, without further ado, let’s get started.
Table of Contents
- Initial APK analysis with MobSF
- Analyzing the native library using Ghidra
- The Exploit code
- It’s Exploit time!
- Conclusion
Initial APK analysis with MobSF
First, download the apk using the following command:-
wget https://raw.githubusercontent.com/OWASP/owasp-mastg/master/Crackmes/Android/Level_02/UnCrackable-Level2.apkNext, upload the file into MobSF and click the “View Source” button in Static Analyzer window. From now on, I’ll be explaining the code.
Now that we’ve the code, you’ll see that the root detection mechanism is still the same, which means we can use the same payload from the first challenge. Next, if you check the sg.vantagepoint.uncrackable2.MainActivity class you’ll see the following code:-
package sg.vantagepoint.uncrackable2;
import android.app.AlertDialog;
import android.content.DialogInterface;
import android.os.AsyncTask;
import android.os.Bundle;
import android.os.Debug;
import android.os.SystemClock;
import android.support.v7.app.c;
import android.view.View;
import android.widget.EditText;
import owasp.mstg.uncrackable2.R;
import sg.vantagepoint.a.a;
import sg.vantagepoint.a.b;
/* loaded from: classes.dex */
public class MainActivity extends c {
    private CodeCheck m;
    static {
        System.loadLibrary("foo");
    }
    /* JADX INFO: Access modifiers changed from: private */
    public void a(String str) {
        AlertDialog create = new AlertDialog.Builder(this).create();
        create.setTitle(str);
        create.setMessage("This is unacceptable. The app is now going to exit.");
        create.setButton(-3, "OK", new DialogInterface.OnClickListener() { // from class: sg.vantagepoint.uncrackable2.MainActivity.1
            @Override // android.content.DialogInterface.OnClickListener
            public void onClick(DialogInterface dialogInterface, int i) {
                System.exit(0);
            }
        });
        create.setCancelable(false);
        create.show();
    }
There are some new additions in this code. On line 16, you can see a private method m is declared using the sg.vantagepoint.uncrackable2.CodeCheck class. Next, on line 18, the java.lang.System.loadLibrary method is used to load a native library. There is no decryption function in this apk as there was in the first challenge. The CodeCheck class is used to make string comparison using the native library. If we look into the CodeCheck class we’ll see the following code:-
package sg.vantagepoint.uncrackable2;
/* loaded from: classes.dex */
public class CodeCheck {
    private native boolean bar(byte[] bArr);

    public boolean a(String str) {
        return bar(str.getBytes());
    }
}
Here, on line 4, a native method bar is used, which is derived from the native library foo. So, now we’ve to disassemble the library and do code analysis using Ghidra.
Analyzing the native library using Ghidra
First, we need to extract the library libfoo.so from the APK. We can get it using apktool. To decompile the UnCrackable-Level2.apk use the following command:-
apktool d UnCrackable-Level2.apkThe libfoo.so libraries for respective architectures can be found inside the lib folder. After you disassemble and analyze the library using Ghidra you’ll see the following:-
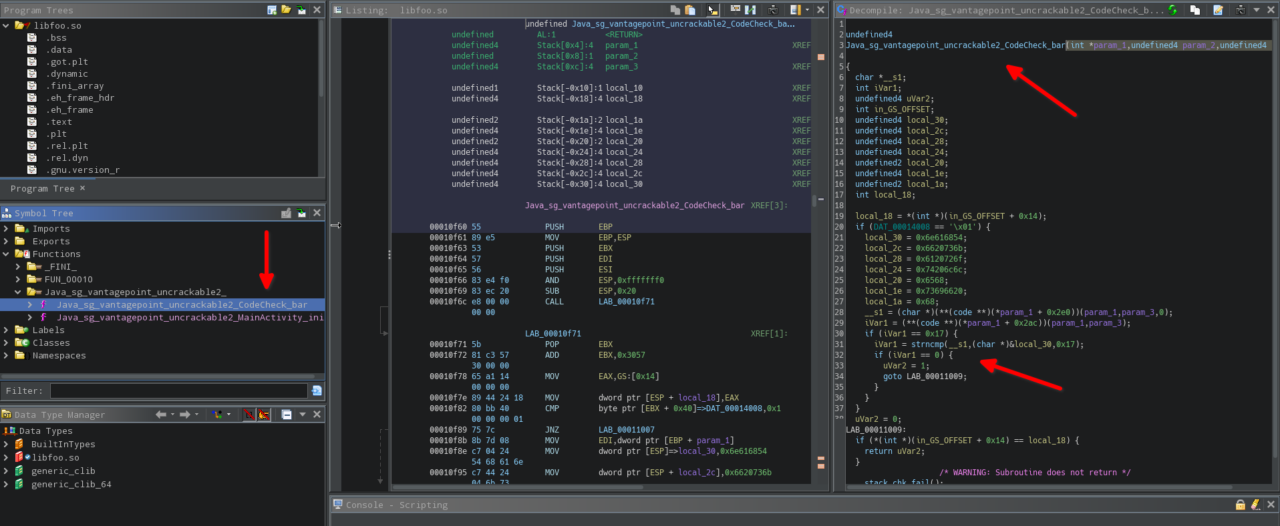
The code for the decompiled bar method is as follows:-
undefined4
Java_sg_vantagepoint_uncrackable2_CodeCheck_bar(int *param_1,undefined4 param_2,undefined4 param_3)

{
  char *__s1;
  int iVar1;
  undefined4 uVar2;
  int in_GS_OFFSET;
  undefined4 local_30;
  undefined4 local_2c;
  undefined4 local_28;
  undefined4 local_24;
  undefined2 local_20;
  undefined4 local_1e;
  undefined2 local_1a;
  int local_18;

  local_18 = *(int *)(in_GS_OFFSET + 0x14);
  if (DAT_00014008 == '\x01') {
    local_30 = 0x6e616854;
    local_2c = 0x6620736b;
    local_28 = 0x6120726f;
    local_24 = 0x74206c6c;
    local_20 = 0x6568;
    local_1e = 0x73696620;
    local_1a = 0x68;
    __s1 = (char *)(**(code **)(*param_1 + 0x2e0))(param_1,param_3,0);
    iVar1 = (**(code **)(*param_1 + 0x2ac))(param_1,param_3);
    if (iVar1 == 0x17) {
      iVar1 = strncmp(__s1,(char *)&local_30,0x17);
      if (iVar1 == 0) {
        uVar2 = 1;
        goto LAB_00011009;
      }
    }
  }
  uVar2 = 0;
LAB_00011009:
  if (*(int *)(in_GS_OFFSET + 0x14) == local_18) {
    return uVar2;
  }
                    /* WARNING: Subroutine does not return */
  __stack_chk_fail();
}
As you can see, on line 30 the C function strncmp is used to compare two strings. If you read the documentation of strncmp then you’ll learn that the first two arguments are pointers to arrays and the third argument is the string length. In the above case, the first argument “__s1” is derived from user provided input string which is passed to the bar method. The second argument is obviously the Secret String we need. The third argument of hex 0x17(which is 23 in decimal) means the Secret String is 23 characters in length and we’ve to provide a 23 character string as our input. Now that we know which function is used for string comparison we can hook this function and get the Secret String!
The Exploit code
Now, the Frida code required to solve this challenge is not very complicated once you refer the Frida JavaScript API. Actually, we can get the Secret String with less code than what we used for the first challenge and once you read my explanation of the exploit code everything will be easy for you. So the exploit code is:-
Java.perform(function() {
  send("Hooked exit() method!! 🪝");
  var hook = Java.use("java.lang.System");
  hook.exit.implementation = function() {
    send("Root Check Bypassed!!! 😎");
    Interceptor.attach(Module.getExportByName('libfoo.so', 'strncmp'),{
            onEnter(args){
                    send(Memory.readUtf8String(args[1]));
                    send(args[1]);
            }
        });
    };
});
The first part of the above code using Java.perform is the same code we used in the first challenge. In the second part I used Frida’s Interceptor instrumentation to intercept calls to the strncmp function which is again easily achieved by Frida API’s Module.getExportByName method. Once I hooked the strncmp function, I used Frida API’s Memory class to extract the Secret String from the memory and print it. The readUtf8String method is used to read bytes at a memory location as an UTF8 string. The args[1] specifies the second argument passed to the strncmp function as I explained earlier. You see it’s easy peasy, the only painful part is reading the API documentation and figuring this out. The send method on line 9 is not necessary and I just added it to show you that args[1] is actually a memory address pointing to the location of the Secret String. So, as you can see that this time we got the Secret String with only three lines of code!
Now, as we did in the first challenge put the above code in “Frida Code Editor” in MobSF and click “Start Instrumentation” button and then click on the “OK” button in the app to bypass root check! After root check is bypassed you’ll see a ton of output, which is because it’s pulling every string comparison instruction into play. Now, we cannot leave the input field in the app blank as we did in the first challenge, because strncmp expects a 23 character string! So, we’ve to enter any random 23 character string, for e.g. something like the one generated by the following command:-
perl -e "print 'J'x23"Enter this string in the input field and click “VERIFY” and you’ll get the Secret String as shown in the image below:-

It’s Exploit time!
As you can see in the image above, the Frida Logs is filled with unnecessary strings, but we’re hackers and we want our exploit to look cool in front of others! So, I added a simple check to print the Secret String only if a certain condition is met, which’ll prevent all other strings from showing up in our output. So, the final exploit code is:-
Java.perform(function() {
  send("Hooked exit() method!! 🪝");
  var hook = Java.use("java.lang.System");
  hook.exit.implementation = function() {
    send("Root Check Bypassed!!! 😎");
    send("Hooked strncmp() function!! 🪝");
    Interceptor.attach(Module.getExportByName('libfoo.so', 'strncmp'),{
            onEnter(args){
              if (Memory.readUtf8String(args[0]).startsWith("JJJJJJJJJJJJJJJJJJJJJJJ")){
                    send("Secret String: " + Memory.readUtf8String(args[1]));
              }}});
	};
});
You can see on line 9, I added a check to print the Secret String only if the user provided 23 character string, i.e args[0](which is the first argument passed to strncmp), starts with “JJJJJJJJJJJJJJJJJJJJJJJ”(startsWith() is a JavaScript function) and thus prevented unnecessary strings from flooding our output.
Conclusion
If you’ve read my solution for UnCrackable-Level1.apk, then following this blog post won’t be difficult for you. In my opinion, the only complicated part of this blog post is where we did code analysis in Ghidra. Still, if you’re proficient in C, then that part will be a piece of cake for you. To be honest, I’d to spend a couple hours studying Frida JavaScript API to arrive at the payload above, which was totally not fun. Still, I recommend studying the API documentation, as it’ll prove very beneficial for a Reverse Engineering career. I’ve plans to do writeups for all the Crackmes provided by OWASP, and I think by the time I finish all of them I’ll be very proficient in Android Reverse Engineering. I think I’ll get a few Android CVEs of my own in the future. And yeah I forgot to mention that even though I get CVEs in all the different categories there are in InfoSec, I still won’t qualify for a Junior Level InfoSec position! Still, I’m sure someday I’ll find a Company with Hiring Managers who have some common sense in them. That being said, I hope someone finds the above guide useful.
Thanks for reading. Peace!