Emulating AARCH64(ARM64) with QEMU – Part 1
Introduction
Whether you’re trying to build/test software for different architectures, or doing reverse engineering/hardware hacking, you’ll often come across the need to possess a build/hacking environment for a different architecture than your PC provides. In that case, you’ll most likely want to virtualize/emulate hardware for a different architecture rather than purchase real hardware. Popular virtualization software like VirtualBox and VMWare are limited to emulating hardware for the host architecture and won’t work when you want to install an OS of different architecture. In such cases, QEMU rules!
For those who don’t know, QEMU is a fast processor emulator which uses dynamic translation to achieve good emulation speed. It supports full-system/user-mode emulation for different architectures along with virtualization. Now, I’m an x86 fan and consider every other architecture secondary when it comes to discussing performance. Also, initially this was meant to be a single blog post, but as I began writing it became so large that I’ve to split it into two parts. So, I’m going to give brief tutorials about:-
- How to use QEMU(which includes everything).
- Create an arm64 development environment(this blog post).
- How to emulate a real-world device/board of different architecture, in this case arm64(the next blog post).
Note:- I also wanted to write about automated machine image creation using Packer QEMU builder plugin, but currently I’m busy on some other stuff(Maybe a post for the future).
Note2:- This guide is as much of a future reference material for myself as it is for everybody else. QEMU command line flags are not easy to remember and if you’re not using it frequently then after a while you’ll have to, most likely, refer the manpages again. The main goal of this guide is to make it easy to understand and follow even for beginners.
Table of Contents
- Prerequisites
- Install required software
- (Optional) QEMU User-mode emulation
- Creating an arm64(aarch64) development environment
- (Optional) Advanced Networking Fun!
- Conclusion
Prerequisites
- An internet connection.
- Free disk space as required.
- An Debian/Ubuntu Linux machine is recommended. You can also use other Linux distros or you can build QEMU from source. Also, you can install QEMU on Windows and MacOS too, but you may need to adapt some parts of this tutorial yourself for Windows and MacOS.
Install required software
First install required QEMU software with the following command:-
sudo apt install qemu-system qemu-user qemu-efi-aarch64And that’s it! Now you’ve installed everything you need to follow this and the next guide.
(Optional) QEMU User-mode emulation
If all you want is to emulate a single binary from other architecture and won’t bother going to lengths of a full-system emulation, then QEMU has also got you covered. As you can see in the following image, I ran a statically compiled 32 bit ARM binary of xxd on a 64 bit x86(AMD64) host using QEMU’s ARM CPU emulation binary qemu-arm.
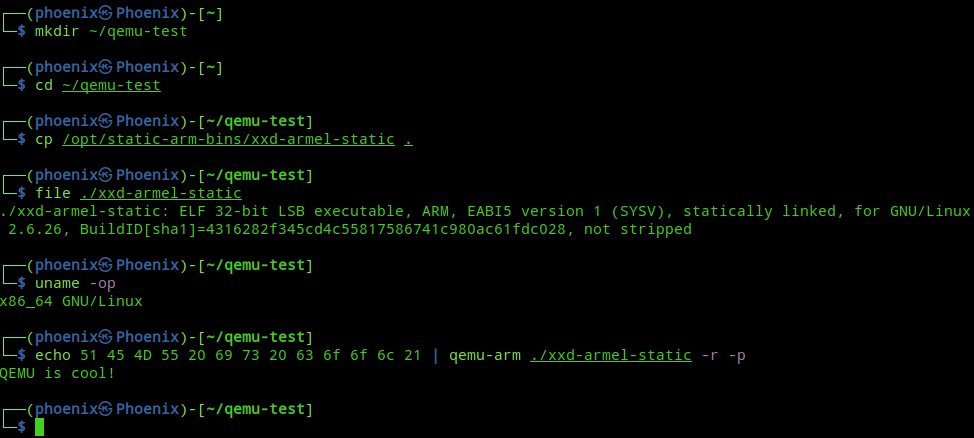
This is possible due to QEMU’s feature for system call translation across architectures. A nice hint on what QEMU is capable of,
QEMU was conceived so that ultimately it can emulate itself. Although it is not very useful, it is an important test to show the power of the emulator.
Source
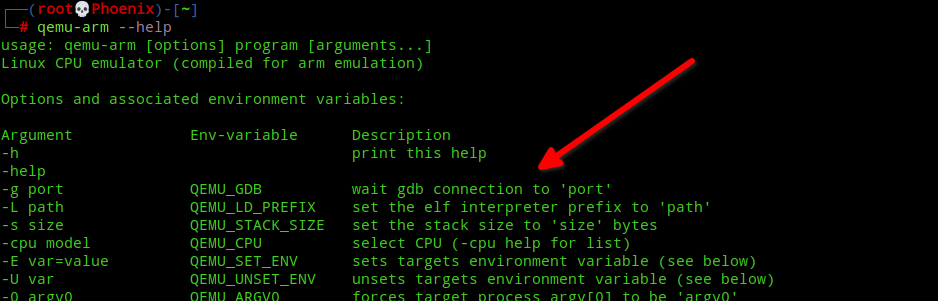
QEMU user-mode emulation supports a lot of architectures. Want to debug a binary from an IBM Mainframe? Then QEMU has got you covered! Debian wiki has a really nice tutorial on QEMU User-mode emulation. Btw, did I mention the qemu-arm command I used in the example above can listen for gdb connections! Honestly, I feel like I’ve just scratched the surface of QEMU. I’ll update this guide in the future once I learn more.
Creating an arm64(aarch64) development environment
The Basics
Although you don’t need advanced hardware knowledge for this tutorial, having good knowledge about PC hardware and peripherals will help you a lot when using QEMU for full-system emulation. Now, I’ve decent knowledge about PC hardware and peripherals and have worked with a few embedded/IoT devices, which helped me quite a lot working with QEMU. So, what is QEMU’s Full-system emulation?
Although Full-system emulation in QEMU provides a lot of flexibility in emulating hardware, in layman terms Full-system emulation with QEMU is just like creating a vm in VirtualBox/VMWare where you normally begin with the following steps:-
- Choose number of CPUs to allocate to VM.
- Choose amount of RAM to allocate to VM.
- Choose installation media, normally an ISO file or sometimes a preinstalled OS disk image file.
- Create a hard disk to install the OS from ISO file. The hard disk can either be of fixed size or dynamically allocated(which means it grows as you use it).
- Create a network interface to be used in the VM.
These steps are the basics of every virtualization software and I want you to keep these firmly in mind as we’re going to follow the above steps with QEMU. The only differences are we’ll be creating a VM for a different architecture than that of host and we’ll be using the command-line instead of GUI!
Now the problem is emulating ARM hardware is a bit tricky. According to QEMU Docs,
For QEMU’s Arm system emulation, you must specify which board model you want to use with the
-Mor--machineoption; there is no default.Because Arm systems differ so much and in fundamental ways, typically operating system or firmware images intended to run on one machine will not run at all on any other. This is often surprising for new users who are used to the x86 world where every system looks like a standard PC. (Once the kernel has booted, most userspace software cares much less about the detail of the hardware.)
Source
As you can see ARM systems are a bit picky when it comes to what firmware/OS they can run. This can be a bit let down as we can’t just run any Linux OS, but thank goodness that QEMU provides us with an excellent solution for this situation. According to QEMU Docs,
If you don’t care about reproducing the idiosyncrasies of a particular bit of hardware, such as small amount of RAM, no PCI or other hard disk, etc., and just want to run Linux, the best option is to use the virt board. This is a platform which doesn’t correspond to any real hardware and is designed for use in virtual machines. You’ll need to compile Linux with a suitable configuration for running on the virt board. virt supports PCI, virtio, recent CPUs and large amounts of RAM. It also supports 64-bit CPUs.
Source
You can learn more about the virt board from here. Now that we got exactly what we need for our situation, let’s roll!
TIP:- Throughout this guide and the next you’ll have to refer the qemu manpage frequently using man qemu-system-aarch64. Other commands that’ll come handy are qemu-system-aarch64 -machine help and qemu-system-aarch64 -device help. For extended help you can use something like qemu-system-aarch64 -device <device name>,help. For e.g, qemu-system-aarch64 -device e1000,help will show you all the extra options you can pass to the e1000 “Intel Gigabit Ethernet” card.
TIP2:- In a manpage, you can type “/”(slash) and then the search string to find the keyword you want. I use this quite a lot to navigate huge manpages. It also supports regex!
We’re going to create a Debian vm. For those who don’t know, Debian has excellent support for more architectures than most people know about. Debian stable is also known for its rock solid stability and a Debian based distro is my choice of Linux when it comes to choosing between Debian/RedHat/Slackware based Linux distros. The only downside to Debian is the packages can be a bit outdated sometimes, but that’s nothing compared to the peace of mind and stability it offers. The latest Debian stable is Bullseye. 🎯
Prerequisites
We need to download two things to build our Debian Arm64 vm.
- A Linux kernel to boot on for installation.
- An initrd. The initial RAM disk(initrd) will act as the installation device for Debian ARM64 net installer. For the uninitiated, the primary function of an initrd is to allow the kernel to mount the root file system. It contains all drivers and supporting programs required for our installer to run.
Note:- The kernel and initrd are only required because we’re trying to emulate an ARM machine on a x86 host. If you want to emulate a x86 machine on your x86 host, then only an ISO CD will be sufficient. Also, we can use an Debian ARM ISO DVD which’ll make the installation inline with the steps I mentioned earlier, but I decided to keep the command line minimal for the installation part.
So, let’s start with creating a directory where we’ll build our ARM vm.
mkdir -p ~/qemu-vms/debianNext switch to that directory.
cd ~/qemu-vms/debianNow, download the Kernel and initrd with the following commands:-
wget http://ftp.debian.org/debian/dists/Debian11.6/main/installer-arm64/current/images/netboot/debian-installer/arm64/linux
wget http://ftp.debian.org/debian/dists/Debian11.6/main/installer-arm64/current/images/netboot/debian-installer/arm64/initrd.gz
Also, as I said we’re going to need a hard drive to install the OS on. To create a fixed size hard drive use the following command:-
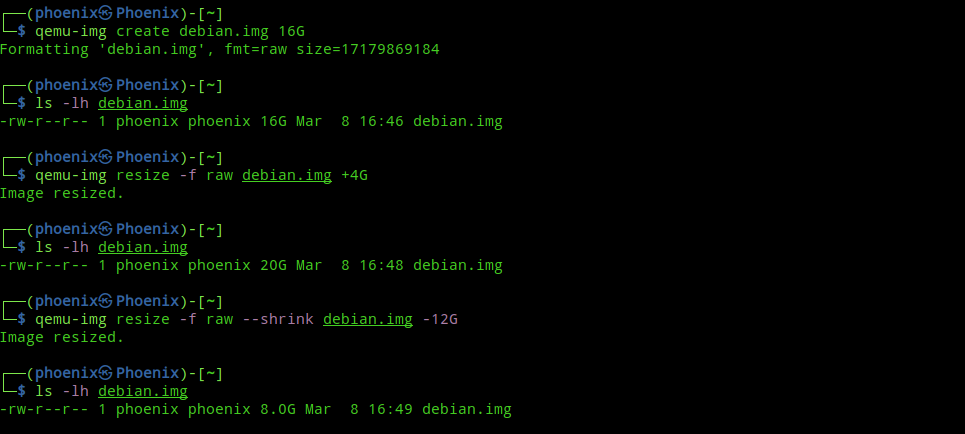
qemu-img create debian.img 16GThis command will create a Raw disk image file taking 16GB of your drive space. If you’re not going to install a desktop environment like GNOME or KDE, then probably a 8GB disk would be fine. Also, you can resize the disk in future using the following command:-
qemu-img resize -f raw debian.img +4GThe above command will increase the drive size by 4GB. You can also shrink an image file, but be aware that if you shrink more than necessary, then it’ll make the image unbootable.
While a Raw disk image file is just okay, the recommended disk format to use when working with QEMU is QEMU’s “Copy On Write”(QCOW) format. The main advantage of this format is initially it won’t take a lot of space in your drive and will automatically grow as you install more stuff into it, just like the “dynamically allocated storage space” functionality provided by VirtualBox/VMWare. To create a QCOW disk, use the following command:-
qemu-img create -f qcow2 debian.qcow 16GTIP:- You can also convert the Raw disk image file to QCOW format. See man qemu-img.
Note:- You can also download Prebuilt Debian cloud images for OpenStack and follow along with this official guide from Debian wiki which’ll make things easier for you, or you can follow along with this guide to learn how to work with QEMU, so that you’ll be ready when you need to emulate a specific machine/board for that Reverse engineering/Hardware hacking project of yours.
Installation
So, now that we’ve dealt with all the prerequisites, it’s time to build the Arm image. The QEMU command to start the installation is:-
qemu-system-aarch64 -machine virt -smp 2 -cpu max -m 4G \
    -initrd initrd.gz \
    -kernel linux \
    -drive file=debian.qcow,if=virtio \
    -nic user,model=e1000 \
-nographic- -machine is the ARM board we want to emulate. As explained earlier, we’re using a virt board.
- -smp defines the number of cpu cores we want to allocate.
- -cpu The name of the ARM cpu we want to emulate. max is a supported guest cpu by the virt board. It provides the best possible emulation with TCG acceleration(which is enabled by default).
- -m is the amount of RAM we want to allocate
- -initrd and -kernel specify the initrd and kernel image we downloaded earlier.
- -drive file=debian.qcow,if=virtio this defines the disk(file=) to use with the drive connected to the virtio storage interface(if=).
- -nic user,model=e1000 The Network Interface Card(NIC) for internet access. The argument “user” specifies a host network backend which requires no administrator privilege to run. For supported NIC models, see qemu-system-aarch64 -nic model=help -machine virt command. Note, although this flag is a neat way to shorten the command line length, we won’t use this for next commands.
- -nographic This says, “No GUI please!”
TIP:- Using more cpu cores will speed up the installation process.
After you run the command, you’ll land on a standard ncurses based Debian installer.
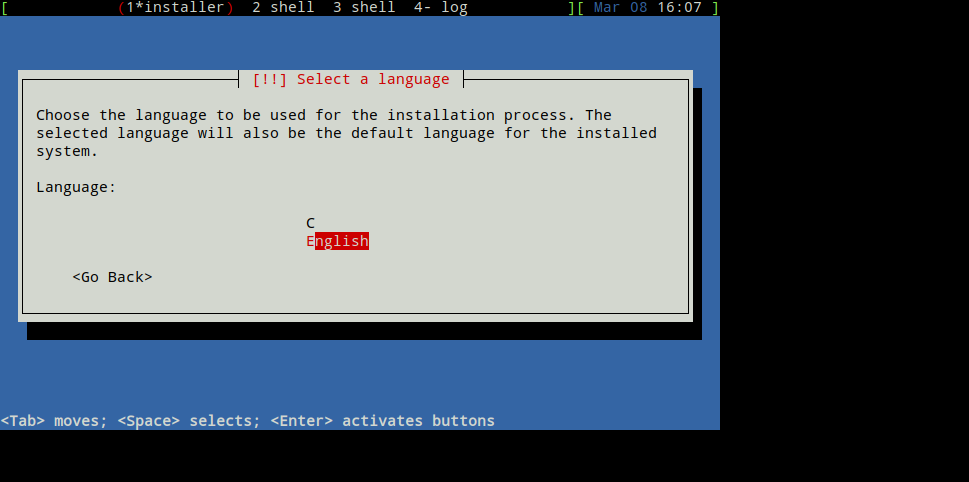
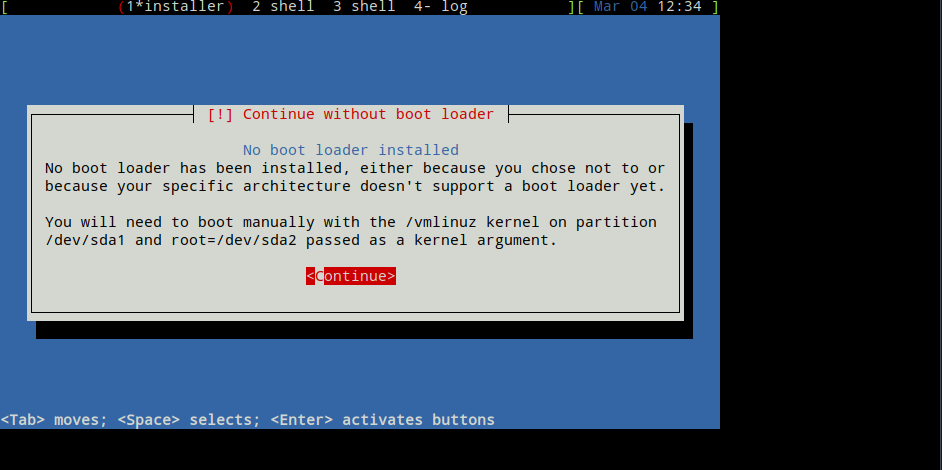
At this point you can tweak the installation to your heart’s content, but I chose to stick with the defaults as this is for a dev environment. Towards the end it’ll complain about no boot loader installed, ignore it and take a note of the second line where it mentions about the kernel and the kernel argument to pass.
After the installation finishes the vm will restart and bring you again to the start of the installation. At this point you can safely close the terminal or open another terminal session and type the following command:-
pkill qemuBooting the image
If you look at the last image, then you’ll see that the installer suggests the we should boot manually with newly installed kernel image in partition /dev/sda1 and “root=/dev/sda2” passed as kernel argument. So, first we need to extract the newly installed kernel and initrd from the debian.qcow file. QEMU provides an utility called qemu-nbd which can be used to export a QEMU disk image(QCOW) using the NBD(Network Block Device) protocol. From there, we can mount the partitions as necessary.
Note:- There are other ways to extract the kernel and initrd, but this is a QEMU specific way.
First load the nbd kernel module with the following command:-
sudo modprobe nbdThen connect a network block device to qemu image.
sudo qemu-nbd --connect=/dev/nbd0 debian.qcowNext, create a folder and mount the first partition of our QEMU disk(/dev/nbd0p1) to the folder.
mkdir mnt
sudo mount /dev/nbd0p1 ./mnt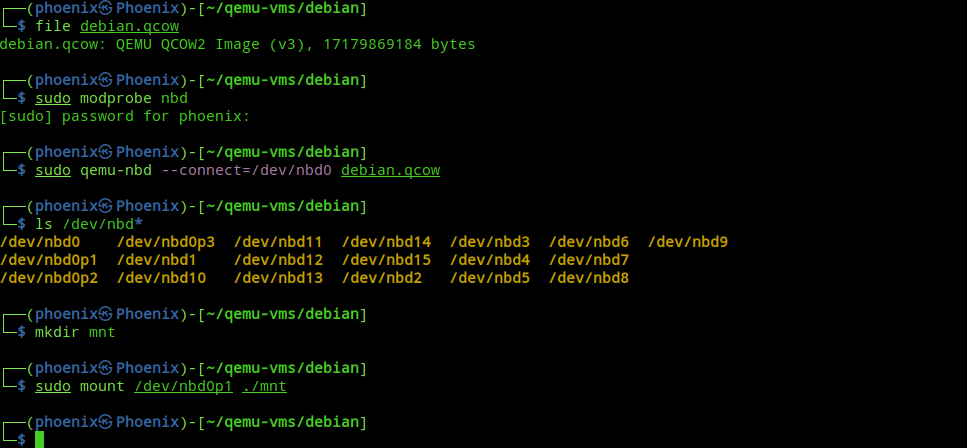
Now, copy the kernel and initrd from the folder, unmount the partition and disconnect the nbd.
cp mnt/initrd.img-5.10.0-21-arm64 mnt/vmlinuz-5.10.0-21-arm64 .
sudo umount ./mnt
sudo qemu-nbd -d /dev/nbd0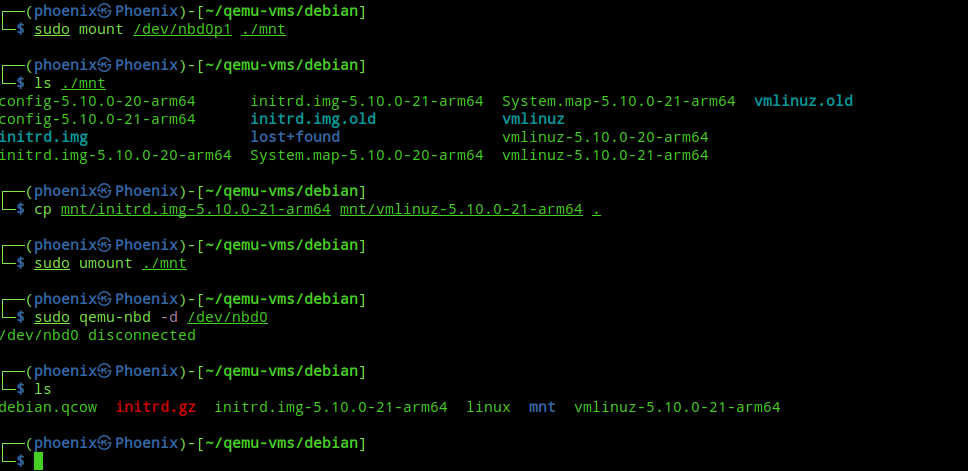
Now, everything is set and we can boot our installation with the new kernel using the following command:-
qemu-system-aarch64 -machine virt -cpu max -smp 4 -m 4G \
	-initrd initrd.img-5.10.0-21-arm64 \
	-kernel vmlinuz-5.10.0-21-arm64 -append "root=/dev/sda2" \
	-device virtio-scsi-device -device scsi-hd,drive=hackd \
	-drive file=debian.qcow,if=none,id=hackd \
	-device e1000,netdev=hacknd \
	-netdev user,id=hacknd,hostfwd=tcp::4444-:22 \
	-nographic
The new flags are:-
- -append append kernel command line arguments. The root=/dev/sda2 argument comes from the part where the installation suggested us to add it as kernel argument which helps in mounting the right root partition at boot.
- -device virtio-scsi-device Emulates a virtual SCSI Bus where we’ll add a “virtual SCSI disk” device.
- -device scsi-hd,drive=hackd Emulates a “virtual SCSI disk” which’ll use the drive with identifier “hackd”.
- -drive file=debian.qcow,if=none,id=hackd Defines the disk drive debian.qcow with identifier “hackd” to be used as “virtual SCSI disk”. Interface(if=) is none because we’ve already connected the disk to SCSI interface.
- -device e1000,netdev=hacknd Here we add a NIC device which’ll use the configuration from a network backend with identifier “hacknd”.
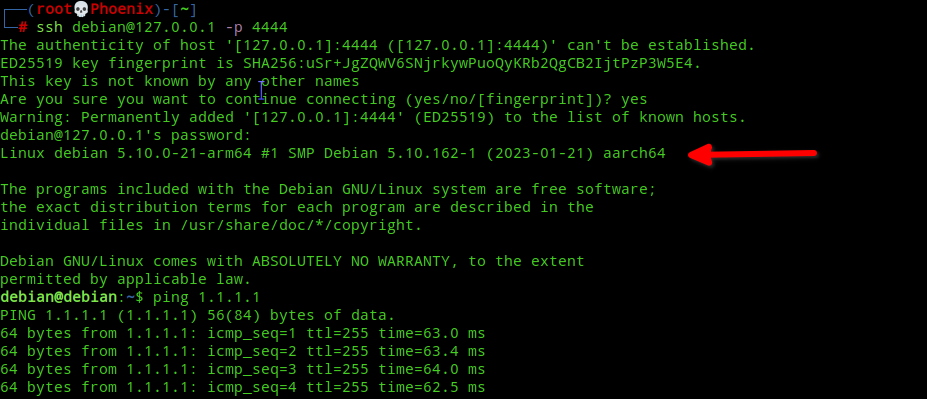
- -netdev user,id=hacknd,hostfwd=tcp::4444-:22 Configure a user mode host network backend which requires no administrator privilege to run. The hostfwd option forwards all tcp connections on port 4444 on the host to port 22 on the vm for ssh access.
So, that’s it! Now, you’ll land in console like the following image:-
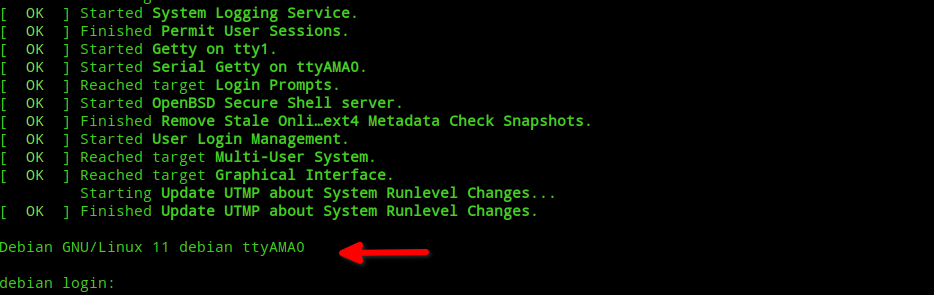
The ttyAMA0 serial console is courtesy of PL011 UART emulated by the virt ARM board we’re using. Even though this doesn’t provides the same level of thrill as getting serial console access on real hardware, it’s still fun. At this point, you can login via the serial console using the root/user credentials you set during installation or you can ssh into the machine via host port 4444.
Btw, a better way of running the QEMU vm would be putting the command into a script. For example, you can create a bash script with the following content and use it to run the vm:-
#!/bin/bash

qemu-system-aarch64 -machine virt -cpu max -smp 4 -m 4G \
	-initrd initrd.img-5.10.0-21-arm64 \
	-kernel vmlinuz-5.10.0-21-arm64 -append "root=/dev/sda2" \
	-device virtio-scsi-device -device scsi-hd,drive=hackd \
	-drive file=debian.qcow,if=none,id=hackd \
	-device e1000,netdev=hacknd \
	-netdev user,id=hacknd,hostfwd=tcp::4444-:22 \
	-nographic
(Optional) Advanced Networking Fun!
Few months ago, while doing my regular development work I needed access to a Windows Active Directory environment to test some of my snap apps. I downloaded Windows Server 2022 but VMWare Workstation didn’t boot the ISO for some oddball reason, probably because my installation was outdated at that time. Anyway, I installed Windows Server in VirtualBox, but next the problem was a Windows AD environment obviously requires some Windows machines to test and all my Windows VMs were in VMWare. So, to solve this I added a bridged adapter to VirtualBox and attached it to my VMWare network interface and then all the Windows VM were accessible by Windows Server inside VirtualBox! You see, a pretty easy hack.
But, now the problem is in QEMU’s user networking, which we used above, the vm is not directly accessible by the host over the network(serial console access is still available). You can see that we used the “hostfwd” option to access a single port and we can also add more ports if need be, but that won’t help us if we want to access the VM directly from VirtualBox/VMWare like I did with my Windows AD environment. But fear not, QEMU’s also got you covered.
Now, to get a high level overview of what we’re going to achieve, I recommend reading the “Bridging” section of this guide. TL;DR we’re going to create a bridge interface and add the main host network interface and the QEMU network interface to that bridge. If you want to, then you can also attach the bridge interface to VirtualBox/VMware and everything will get an IP straight from the router the host network is connected to. You see, easy peasy.
WARNING:- I highly recommend having a separate network adapter handy, like an wireless USB adapter or maybe an ethernet connection. I use ethernet for my main network and have a backup PCI-E wifi card and a wireless USB adapter. The reason is, if you’ve some oddball network configuration in your host or if you mess up some configuration, then you’ll most probably lose internet connection and in the worst case even a reboot won’t fix your problem. If you proceed from here, you do so at your own risk!
So, let’s start with installing the required package with the following command:-
sudo apt install bridge-utilsNote:- Although it is not necessary, I recommend taking a look at man brctl and man bridge-utils-interfaces.
Now, go and read this guide from Debian wiki first, or if you’re the TL;DR kind, then you can follow along and refer the guide when necessary. What configuration I’m going to show next is entirely based on that guide, the only difference is I’ll be using newer QEMU command line flags. Also, if you’re using a Ubuntu-based distro like me, then your networking would be setup with Netplan instead of /etc/network/interfaces which ships by default with most Debian based distros and is required for our setup. If you’re using Ubuntu, then you can refer this guide to switch back to /etc/network/interfaces.
Now, me being me, I run both Netplan and /etc/network/interfaces on my host as required. Anyway, I’ll assume that you’ve /etc/network/interfaces setup in your host. To learn more about interfaces, I recommend seeing man interfaces. My interfaces file looks like this:-
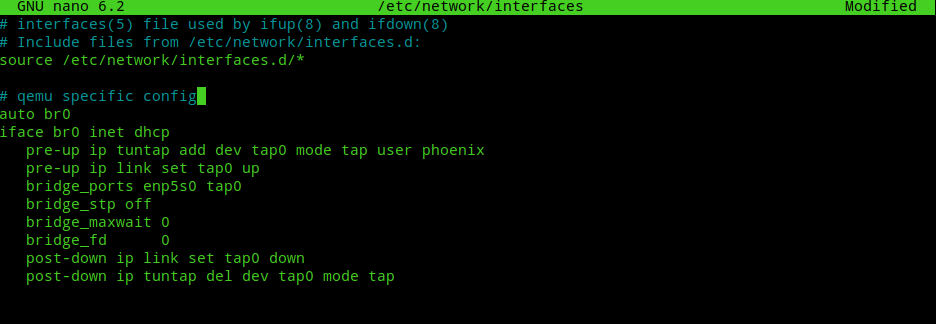
Note:- I wanted to show how to configure the networking manually, so that the reader would have a strong grasp of bridged networking, but this blog post is about QEMU/ARM64 and not about networking. Hit me up in the comments if you want me to write a detailed blog post on how to manually configure Bridged networking.
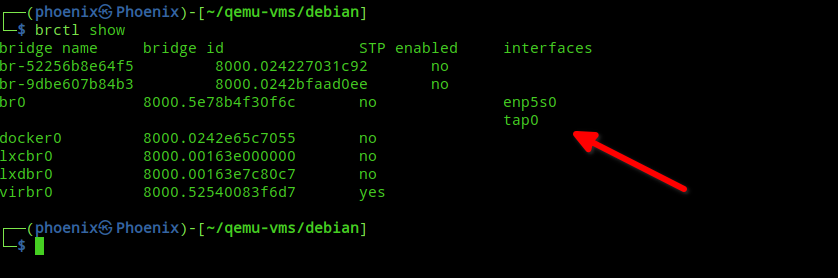
You can copy the code from Debian wiki article I mentioned earlier and replace your username there and instead of “all” as mentioned in the article I recommend using only your main host network interface. After that, use the following command:-
sudo systemctl restart networkingNow, the command “brctl show” should show something like the following where enp5s0 is my host’s main network interface:-
Now, it’s time to boot the QEMU vm and enjoy a four-way bridge. Use the following command to start your vm:-
qemu-system-aarch64 -machine virt -cpu max -smp 4 -m 4G \
        -initrd initrd.img-5.10.0-21-arm64 \
        -kernel vmlinuz-5.10.0-21-arm64 -append "root=/dev/sda2" \
        -device virtio-scsi-device -device scsi-hd,drive=hackd \
        -drive file=debian.qcow,if=none,id=hackd \
        -device e1000,netdev=hacknd0 \
        -netdev tap,id=hacknd0,ifname=tap0,script=no,downscript=no \
        -nographic
Note:- Although the “-net” flags used in Debian Wiki works, the “-net” flag is considered obsolete by QEMU and I used the newer “-netdev” syntax instead.
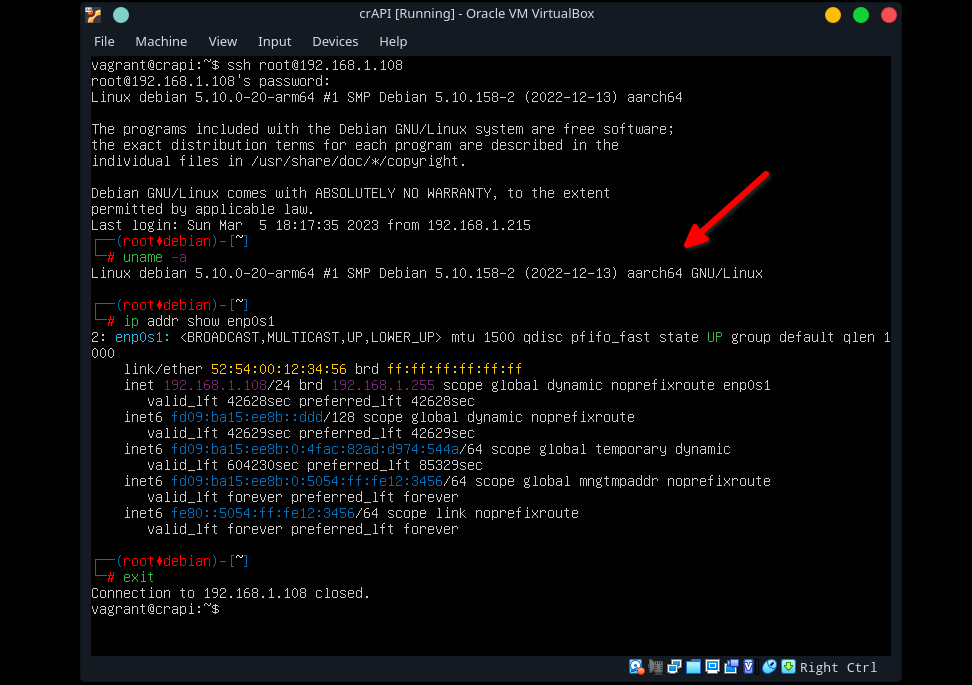
And now, I can access my QEMU vm from VirtualBox/VMWare and vice-versa. This following image shows me accessing my QEMU vm from VirtualBox.
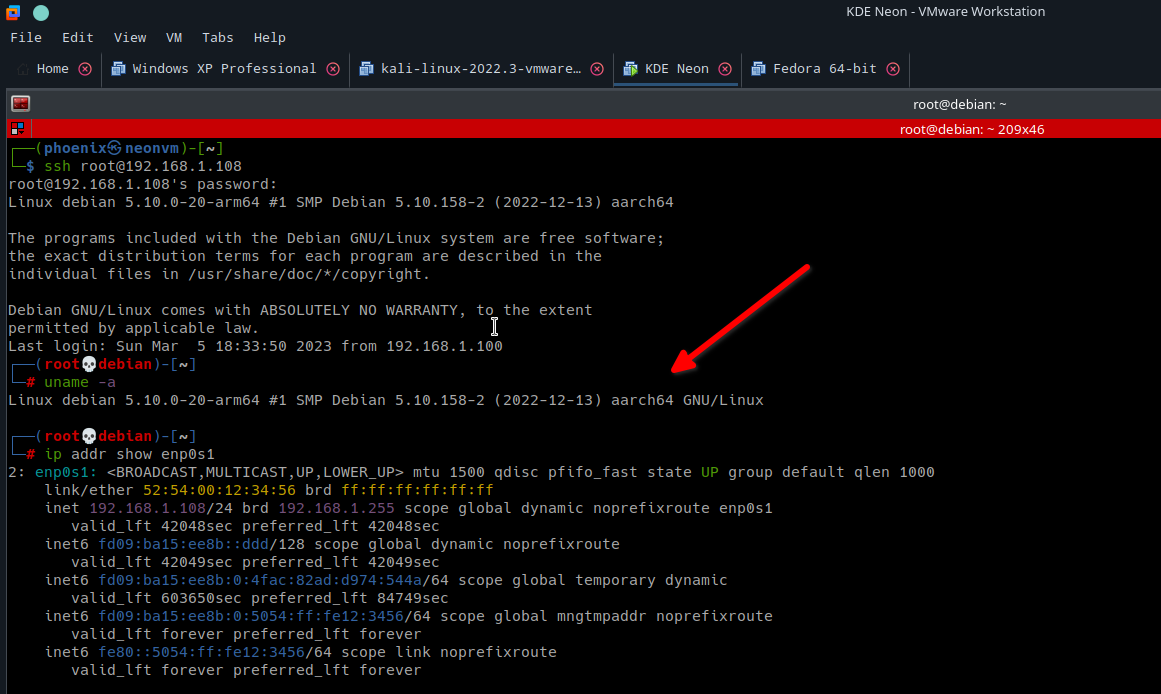
And this one from VMWare.
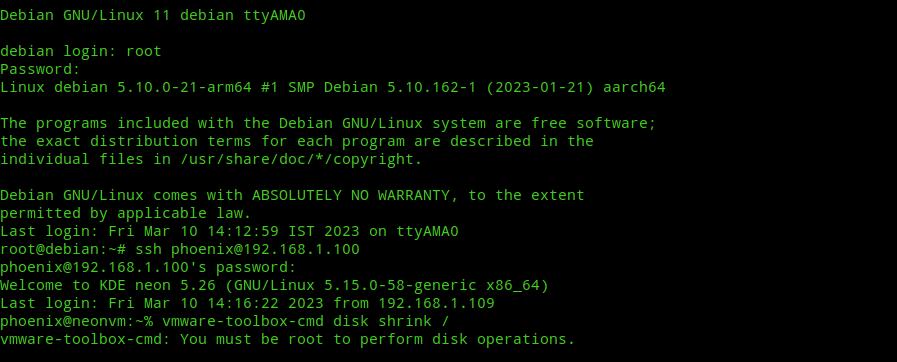
And in this one I accessed my VMWare virtual machine from QEMU vm’s serial console.
Note:- If this doesn’t work, then try checking if your firewall settings are blocking traffic from the bridge interface. Checking the syslog while running the vm will help in debugging networking problems.
Conclusion
QEMU is dope and I love it! QEMU is a great example of the raw power of Linux. If you liked this blog post, then you’re going to enjoy it’s second part. I’ll try to release the part two as soon as possible. I think being able to easily emulate real-hardware should be on the top of “things to learn” list of every hardware hacker. If you know the target hardware well, then all you need is access to the device’s firmware to emulate it with QEMU. This guide by ZERO DAY INITIATIVE is a great place to start in that direction if you don’t want to wait for my next part. I hope someday I’ll get to write about a CVE I find in an embedded/IoT device. Btw, I’ve to get a job in CyberSecurity first, otherwise nobody will ever care how many CVEs I gather and all my advanced Security knowledge will be for nothing. Someday I’m going to figure out how to get a job in CyberSecurity. It’s only “not easy” until you learn how. 🙂
Thanks for reading. Peace!
Hello,
i can’t login for some reason ? . it says access denied. is there any default password for debian. i actually set that one. but still its showing access denied. i tried the installation three times now
Hi. You mean “Permission denied” right? Did you set a “root” password? If yes, try logging as “root” and changing the password for “debian”.