Configuring Two Factor Authentication for ‘su’ and ‘sudo’
Linux security is a constantly evolving topic. One of the biggest security related headaches for Administrators is granting Sudo privileges to users. Sudo privilege when unchecked can become the primary target of attackers for gaining persistence in networks. Today, we’ll dive into how to secure sudo and su commands in linux with Two Factor Authentication.
Note:- This guide is meant for Advanced users/SysAdmins who understand what they’re doing. Blindly copying and pasting commands can lock you out of your own machine. So, I recommend reading carefully before using any command.
Setting up 2FA for ‘sudo’
Setting up Two Factor Authentication for sudo is as simple as installing a package and editing a configuration file. First, install the google-authenticator PAM module with the following command:-
apt install libpam-google-authenticatorNote:- If you’ve followed my guide on securing SSH with 2FA you would’ve already installed and enabled 2FA. If that’s the case, then you can skip this step.
Next we’ll setup google-authenticator using the most secure way. For that we need to choose an appropriate location to store our TOTP secret key and backup codes. Here, I’ve created a directory called twofactor in /var/lib with the following command:-
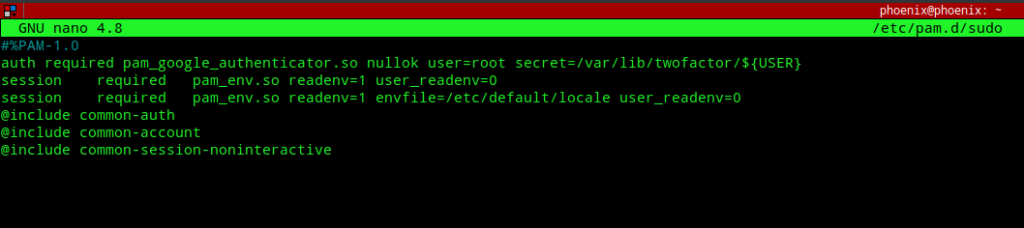
mkdir /var/lib/twofactorNext, we need to edit /etc/pam.d/sudo to enable google authenticator module. Edit the file and add the following line to the top:-
auth required pam_google_authenticator.so nullok user=root secret=/var/lib/twofactor/${USER}
The above line can be explained as follows:-
- It triggers the
pam_google_authenticator.somodule every time an authentication attempt with sudo is made. - The nullok directive tells that, enable 2FA only for those users who have configured and enabled Google authenticator for their accounts. If this option is not set all users who’ve not yet configured 2FA will be prevented from using sudo. You must remove the nullok directive as a security measure once 2FA is configured for all users .
- The user=root option means that it’ll use the privilieges of the root user to read the TOTP token from the
secretfile which is next defined. - The ${USER} variable specifies the user specific token file to read. Also, adding the following line to the top of
/etc/pam.d/sudowill prevent users from authenticating with a password without first entering a Verification code.
Note:- I’ve assumed that you’ve root privileges on the machine and you’re enabling Two Factor Authentication for the users of your machine. As such you’re expected to provide the respective users with the backup codes that we’ll generate next so that they can recover their accounts in case they lose access to their 2FA device.
Next, we’ll enable Two Factor Authentication for the users with the following command:-
sudo google-authenticator -t -f -d -w 3 -e 5 -r 3 -R 30 --secret /var/lib/twofactor/phoenix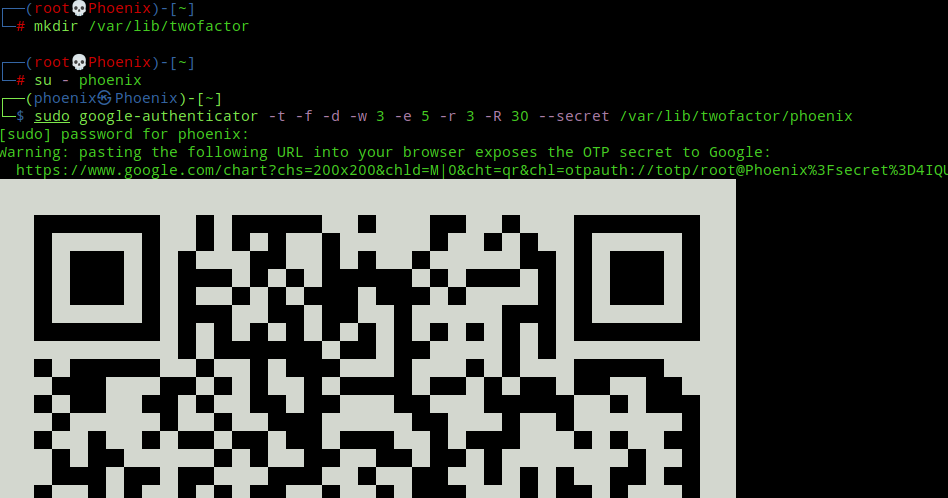
The options used mean:-
- -t: Use time-based OTP verification
- -f: Create the secret file without prompting for confirmation
- -d: Prevent re-use of same TOTP tokens
- -w 3: Set the window of concurrently valid codes. By default, a new token is generated every 30 seconds by the 2FA mobile app. In order to compensate for possible time-skew between the client and the server, we can allow an extra token before and after the current time, by setting the value to 3. Note, this is the default if you use the manual way as explained in one of my previous post.
- -e 5: Generate 5 backup codes.
- -r 3 -R 30: Rate limit logins to 3 every 30 seconds.
- –secret /var/lib/twofactor/phoenix: store the TOTP token and backup codes for phoenix(change this to your user) user in the folder
/var/lib/twofactor. Note, using the exact username as shown in/etc/passwdfile is important as we’ve set up/etc/pam.d/sudoto read using the ${USER} variable which expects the unix username.
By default, the file created in /var/lib/twofactor or your chosen directory will have the permissions set to 400, i.e, readable only by the root user as we executed the google-authenticator command with sudo.

If you’ve not used sudo to create the file and hadn’t used root privileges to create the directory, then you are doing things wrong. If that’s the case, make sure you change the ownership of the directory to root and then set the permissions to 400 with the following commands:-
sudo chown root:root /path/to/your/directory
sudo chmod 400 /path/to/your/directory/*
Now, next time the user executes any command with sudo he’ll be prompted for a verfication code first and then the password.
Setting up 2FA for ‘su’
The biggest problem with the above setup is that people can still use su to switch to root or any user if they know the user’s password. This is a serious security hole and defeats our purpose of setting 2FA for sudo. Wouldn’t it be nice if using the su command also asks for a TOTP verification code alongwith the password? Well, we can use the same procedure as above and edit the /etc/pam.d/su file to prevent users from switching to other users with just their passwords!
Edit the /etc/pam.d/su file and add the following line to the top:-
auth required pam_google_authenticator.so nullok user=root secret=/var/lib/twofactor/${USER}
Adding the line to the top will prompt anyone using the su command with a Verification code: prompt first and only after entering the correct TOTP code their password input will count as valid.

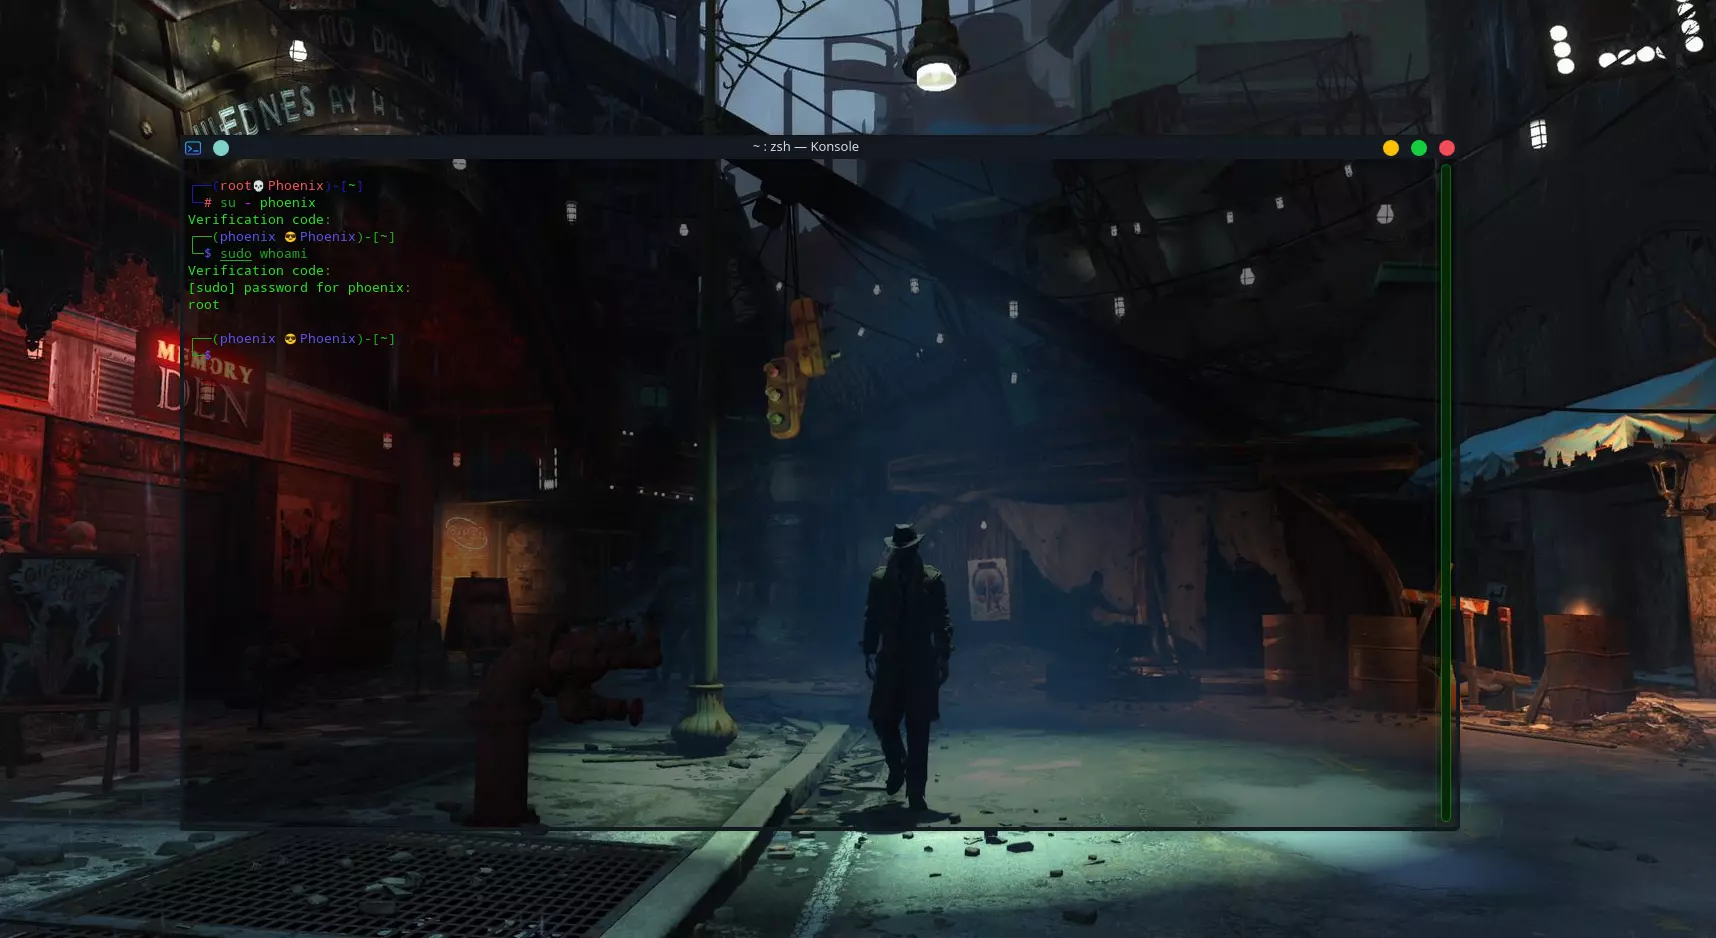
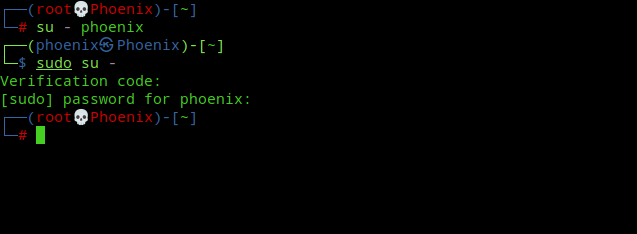
Now the clever ones from you must be thinking that, can’t we just bypass 2FA for su using “sudo su” to escalate privileges to root as we’ll already be authenticated as root via sudo! Well, no such luck my friend. Take a look at the below image:-
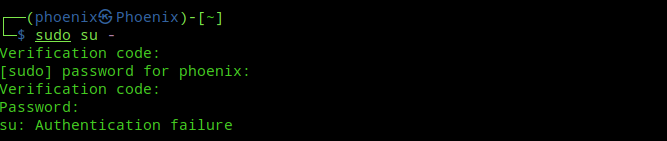
What do you think just happened? Let me explain. First, the user is prompted for a verification code and password for using sudo and after that the su command kicks in asking the verification code and password of the “root” user! Here, sudo and su are treated as separate commands, as they should be! Pretty nice, ain’t it?
Note:- There are three downsides to this. First, 2FA needs to be enabled for the user account or there will be no prompt for entering verification code. Second, the switching to any user from root now will require to enter the verification code for that user, which is not so convenient anymore even if you’re root! Third and most important of all is you can just use “sudo -s” and get a root shell completely bypassing su! 🙂
Conclusion
Enabling Two Factor Authentication can take your server a long way in terms of security but this shouldn’t be your last resort. There is still much need to be done to restrict users from executing just about any command, for e.g, configuring the /etc/sudoers file to restrict users to only use sudo for specific set of commands as necessary, can boost the security of your server by a mile.