Installing and securing OpenVPN Access Server
Introduction
I don’t think people now-a-days need an introduction about what a VPN is. Everybody knows a VPN helps in hiding our online traffic from our ISPs, helps to bypass geographic restrictions, provides security when working remotely etc., but what most don’t know is most VPN service providers keep logs about what you do! While most of them won’t be sharing your data with third parties, almost all of them would comply with their local Government when asked to hand over your internet traffic. Honestly, I won’t blame them for complying with their respective Governments because that’s what we all do. If you’re living in a country or doing business in it, then you or your business comes under the jurisdiction of that country. While VPN providers can deny every other Government on Earth access to their customers data, they can’t deny their local government because that’d mean they’d have to shut down their business. Tell me, won’t you comply with your local Police if they come to your house with a search warrant with them! I know a lot of popular VPN service providers claim that they don’t keep logs, but can you be 100% sure about that!?
That being said, now-a-days the only way to keep your internet traffic completely safe from getting into the hands of other people is to use your own VPN server. I know that’d mean escalating costs for most people but as I mentioned in my first post we’ll use the same VPN server for a lot of other cool purposes. The only downside to this will be losing the flexibility of having access to lots of VPN Servers worldwide as provided by VPN service providers. If that’s important to you, then I’d recommend keeping your VPN subscription but if privacy is of utmost importance, then you must’ve your own VPN server. These are the topics I’ll be covering today:-
- Choosing a cost-effective cloud server
- Choosing the right operating system
- Installing OpenVPN Access server
- Restricting SSH to VPN connection only
- Restricting all services to one port
Choosing a cost-effective server
After looking for a Cloud Service provider which provides the most bang for my buck, I settled with Linode. Linode is the largest independent cloud provider which focuses mainly on providing Linux cloud solutions. Their servers have the best Cloud CPU Benchmarks among top cloud solution providers. But most important of all is that they provided their high performing servers for a starting cost as low as five dollars($5) per month! As Linux is kind of my jam, choosing them was a no-brainer for me. If you want to get started with them, then they’ve a $100 credit for 60 days promotion going on if you signup via this link.
Note:- You’re free to choose any Cloud solutions provider you like and you can even self-host your server if that’s kinda your thing. But, to follow along with my tutorials you must use the Operating System I mention next.
Choosing the right operating system
Linux is undoubtedly the go-to choice for server operating systems. But the question is what to choose among the wide varieties of Linux Distros available out there? Choosing the right operating system for a server is of utmost importance for a variety of reasons but most important of all is stability, robustness and OS support. For this tutorial and the following ones I’ll be using Ubuntu 20.04 LTS server. Ubuntu is based off Debian and its LTS releases are well known for rock solid stability. The main reason I choose Ubuntu for my server is because of its ease of use. Almost all major software vendors out there provide an official guide on how to install their software on Ubuntu. You’re more likely to find online guides to troubleshoot problems on Ubuntu Server than any other Linux distro. That being said, to create your first linode you can refer Linode’s official getting started guide, just remember to choose Ubuntu 20.04 as the server operating system and Nanode($5) for your subscription plan. After you’ve created your first Linode and SSHed into your linode you can follow this guide.
Note:- If you don’t have terminal access and are using Linode, then you can use your web browser to login into your server and after that you can continue with this guide. For more info check this link on how to use Linode Lish console via a web browser.
Installing OpenVPN Access Server(AS)
Installing an OpenVPN server on Ubuntu is as easy as copying and pasting a few commands. First start with updating and upgrading packages on the server.
apt-get update && apt-get upgradeInstalling a OpenVPN AS in Ubuntu 20.04 requires us to set a proper timezone. You can use the date command to see what the current time, date and timezone are. To set the proper timezone use the following command:-
apt -y install tzdata && dpkg-reconfigure tzdataChoose the continent where you live and the timezone that’s appropriate for your location when prompted. To install OpenVPN AS use the following commands:
apt -y install ca-certificates wget net-tools gnupg
wget -qO - https://as-repository.openvpn.net/as-repo-public.gpg | apt-key add -
echo "deb http://as-repository.openvpn.net/as/debian focal main">/etc/apt/sources.list.d/openvpn-as-repo.listSource:- Official Guide
apt update && apt -y install openvpn-as
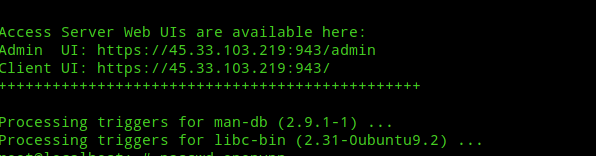
At the end of installation you’ll get two links to Admin Web UI and Client Web UI.
But to access the above UIs we need an user. When openvpn-as is first installed a default administrative user called openvpn is added to the system and to be able to use the Access Server we’ve to set a password for the user. To set the password use the following command:-
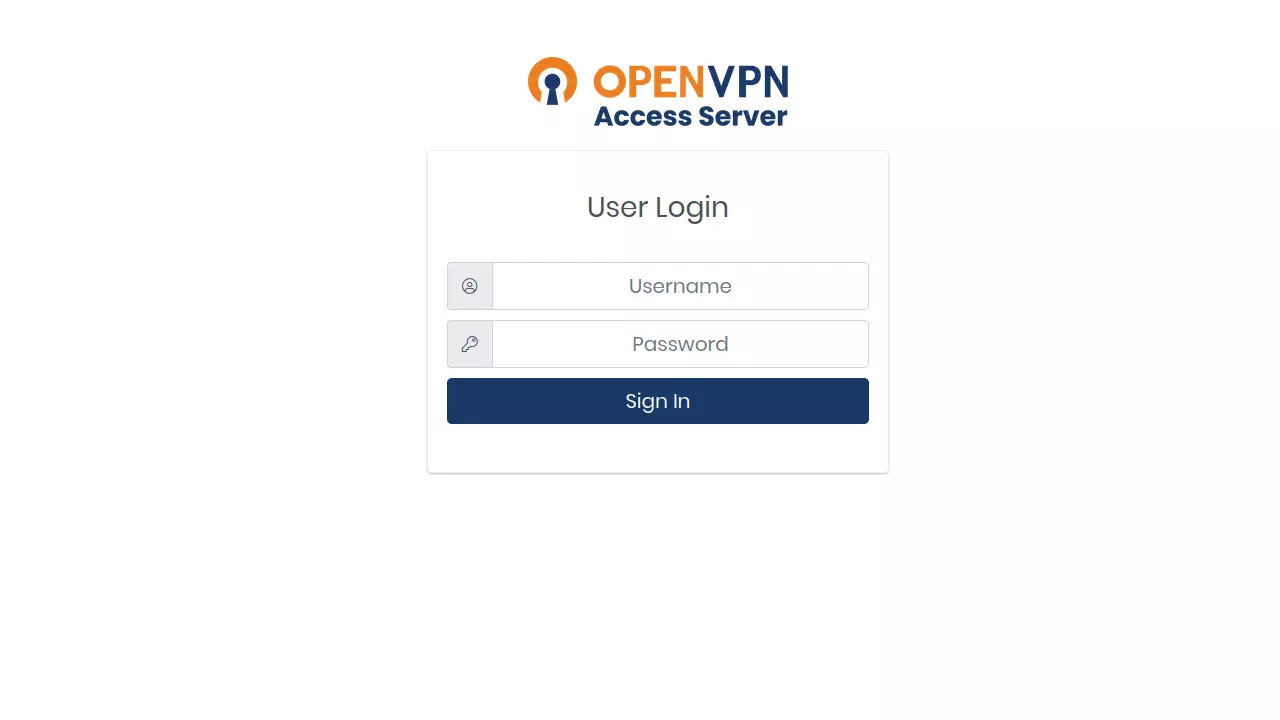
passwd openvpnAfter setting the password open the link to Admin UI. You’ll see a page like this:-
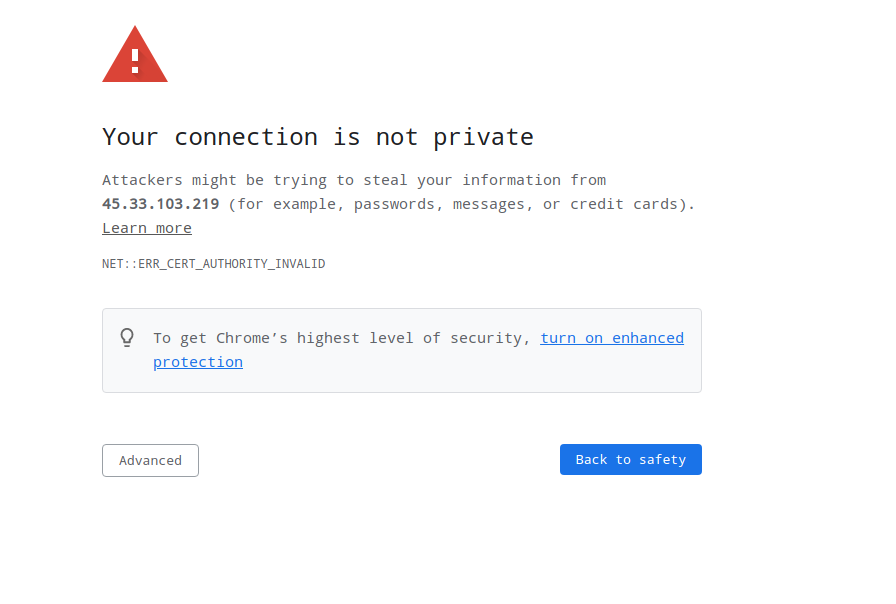
Click on Advanced and then click on Continue/Proceed(depending on your browser). Next, use the openvpn username and the password you set for it to login. Then, click on Agree. Then follow the steps below:-
Step 1: Create a new user
When you’re logged in click on USER MANAGEMENT in the sidebar and then click on User Permissions. On the User Permissions page add another username and check the Admin checkbox to enable admin privileges for it. Then click on More Settings and add a password for the user and then click on Save Settings button at the bottom of the page.

Note:- You can also check the Allow Auto-login checkbox to enable autologin, it’ll create a auto-login profile for you which will be helpful in making a direct vpn connection without password. If unchecked, it’ll prompt you for a password and OTP(if 2FA is enabled) to make a vpn connection. Also consider creating a non-admin user and using it for making vpn connections.
Next, click on Update Running Server when you see something like the following image:-

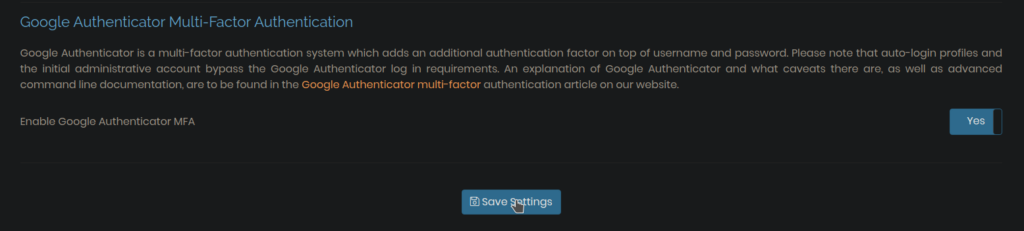
Step 2: Enable 2FA
Next, click on AUTHENTICATION in sidebar and then click on General. In the next page, enable Google Authenticator MFA and click on Save Settings.
Then logout and login as the new user. You’ll be prompted for enabling Two Factor Authentication(2FA). Scan the QR code through your Authenticator app and add the 6-digit code shown in the app and then click on Confirm Code button. 2FA will be enabled. Note, you must save the secret key shown below the QR code for recovery purposes.
Step 3: Delete Default user
The default openvpn user is an exception to 2FA requirements and thus a security risk for us. As a prevention measure delete the user after logging in as the new user. On the User Permissions page click on the Delete check box in the openvpn user row and then click on Save Settings.

Next, on the command line type the following commands to delete the password of the openvpn user and then delete the user itself:-
passwd -d openvpn
deluser openvpn
Next, open /usr/local/openvpn_as/etc/as.conf in you favourite editor and comment or delete the line
boot_pam_users.0=openvpn
After this is done, restart openvpnas service to apply our changes.
systemctl restart openvpnas.serviceStep 4: Securing VPN Connection
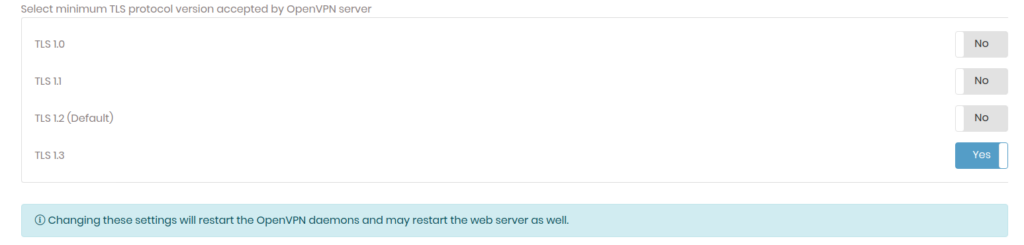
Next click on CONFIGURATION in the sidebar and then click on TLS Settings. In the TLS Settings page, change the minimum TLS protocol version to TLS 1.3.
Note:- don’t click on Update Running Server right now as we need to change other configs.
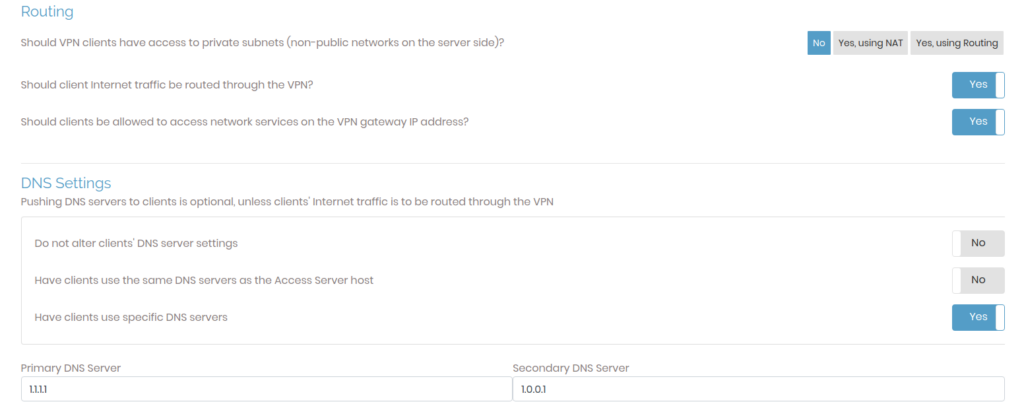
Next, click on VPN Settings in the sidebar. Then change the # of Netmask bits to 24(255.255.255.0) to restrict no. of hosts on the network to 254. You can leave this at default but we don’t need that large a subnet.

Next, under Routing change Should VPN clients have access to private subnets (non-public networks on the server side)? to No. Then, under DNS Settings set the DNS servers to your preferred secure DNS server and then click on Save Settings.
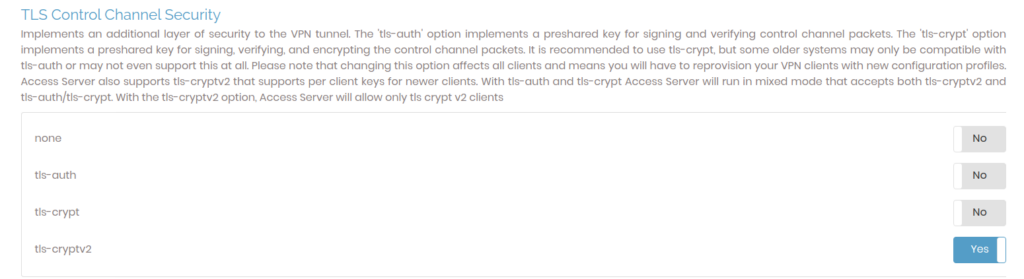
Next, click on Advanced VPN on the sidebar and on the next page change enable tls-cryptv2 under TLS Control Channel Security and then click on Save Settings. Next click on Update Running Server to apply the settings to our server configuration.
Step 5: Download vpn configuration
Click on Client UI link shown at the time of installation and login to the Client Web UI. Download the vpn client that suits your local Host Operating System. By default, the installer comes shipped with a server-locked profile that can be used to connect to vpn. For additional profiles you can download one of the Available Connection Profiles mentioned below on the page.
Note:- An user-locked profile and a server-locked profile will require a password and OTP(if 2FA enabled) to connect to vpn and an autologin profile will automatically connect you to the vpn.
Step 6: Disable vpn logs
As one of the primary reasons of installing our own OpenVPN server is not having logs, we’re going to disable all logs kept by openvpnas service. If you want to keep logs about what you do when connected to VPN, then you can skip this step. But I’d recommend disabling any logs so that in the unlikeliest scenario if someone gets access to your server they won’t get access to what you do on the internet. 🙂
Openvpn Access Server keeps logs in two locations. They are:-
/var/log/openvpnas.log
/usr/local/openvpn_as/etc/db/log.db
To disable the first log file use the following command:-
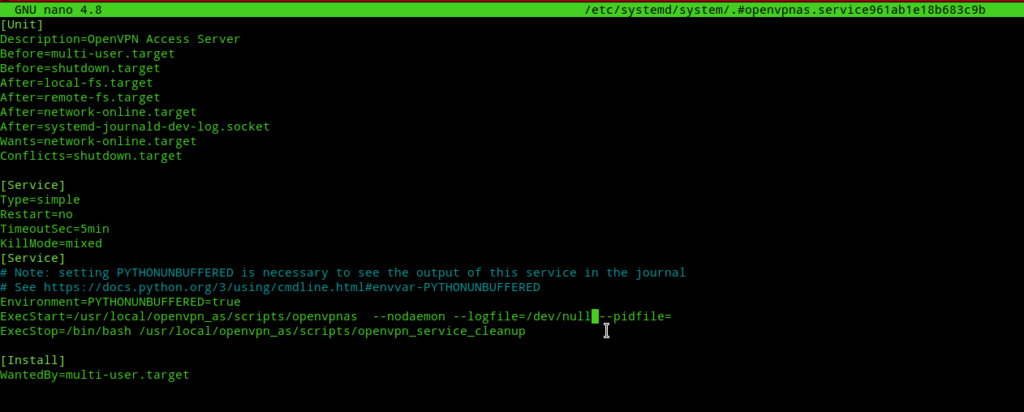
systemctl edit --full openvpnas.serviceIt’ll open the service file in the default editor. Next change the value of --logfile switch in the ExecStart line to /dev/null as shown in the snippet below.
[Unit]
Description=OpenVPN Access Server
Before=multi-user.target
Before=shutdown.target
After=local-fs.target
After=remote-fs.target
After=network-online.target
After=systemd-journald-dev-log.socket
Wants=network-online.target
Conflicts=shutdown.target

[Service]
Type=simple
Restart=no
TimeoutSec=5min
KillMode=mixed
[Service]
# Note: setting PYTHONUNBUFFERED is necessary to see the output of this service in the journal
# See https://docs.python.org/3/using/cmdline.html#envvar-PYTHONUNBUFFERED
Environment=PYTHONUNBUFFERED=true
ExecStart=/usr/local/openvpn_as/scripts/openvpnas  --nodaemon --logfile=/dev/null --pidfile=
ExecStop=/bin/bash /usr/local/openvpn_as/scripts/openvpn_service_cleanup

[Install]
WantedBy=multi-user.target
Note:- After the first edit the openvpnas.service file will be created in /etc/systemd/system/ and then you can directly edit it from there.
Save and close the file. Next check if there are any logs already in that log file.
cat /var/log/openvpnas.logThen clear the file of any logs if present with the following command:-
echo " " > /var/log/openvpnas.logAfter the first log file is cleared we’ve to take care of the other log file. Next, open up the /usr/local/openvpn_as/etc/as.conf with your favourite text editor and edit the log_db variable value to /dev/null.

Save and close the file. Next check if there are any logs already in that log file.
cat /usr/local/openvpn_as/etc/db/log.dbThen clear the file of any logs if present with the following command:-
echo " " > /usr/local/openvpn_as/etc/db/log.dbAfter everything is set restart the openvpnas service to apply our config changes.
systemctl restart openvpnas.serviceNow, connect to the vpn and browse the web casually. After sometime check the log files again and you won’t find any logs being taken. Mission Successful! 🙂
Restricting SSH to VPN connection only
As I said in my previous post I’m going to show how to restrict SSH access to vpn connection only! This is a lot simpler to do when you know the concept behind it. If you look into the Step 4 of Installing OpenVPN AS above where we set the netmask bits, the network address must be set to 172.27.224.0 which means the gateway for our vpn connection and the IP address of openvpn interface in our server should be set to 172.27.224.1. Lets check this out.
On the Ubuntu server type one of the following commands:-
ifconfigChecking ip addresses of all interfaces
ip addr
The result should be something like this:-
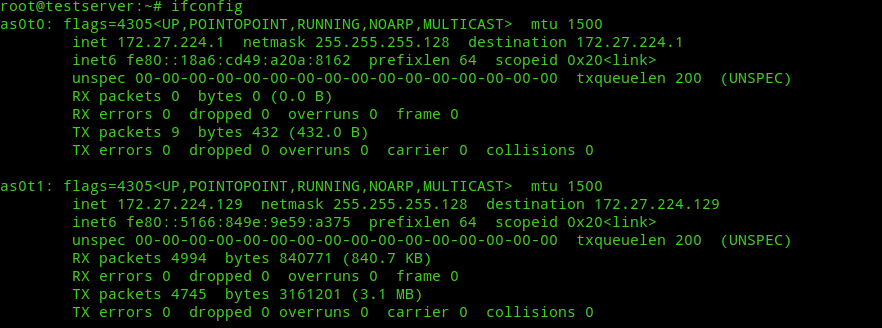
Note:- The command will output two vpn interfaces as0t0 and as0t1 instead of one because we’re running OpenVPN AS in Multi-Daemon mode which creates two instances of openvpn server one each for TCP and UDP daemons for load balancing. In the future we will make the server UDP only.
Next on your local machine type traceroute jitendrapatro.me in terminal(if you’re using Linux) and tracert jitendrapatro.me in cmd (if you’re using Windows). You should see the ipv4 address of your VPN server interface set to either 172.27.224.1 or 172.27.224.129 as the first hop. Next, in your server check which interface SSH server is listening on(by default SSH service binds to all interfaces on port 22, i.e, 0.0.0.0). To check this use the following command:-
netstat -tulnpYou’ll get an output similar to this:-
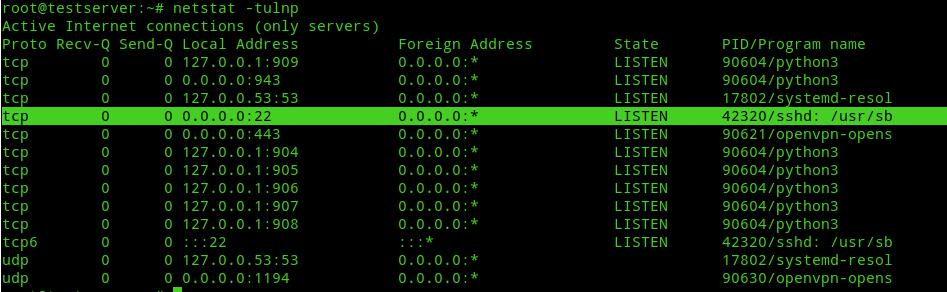
So technically this means if we SSH using the IP address of the vpn server, i.e, 172.27.224.1(while connected to vpn) we’ll be able to SSH into our server as SSH is also listening on port 22 on the openvpn interface. The following image shows SSH login to vpn gateway:-
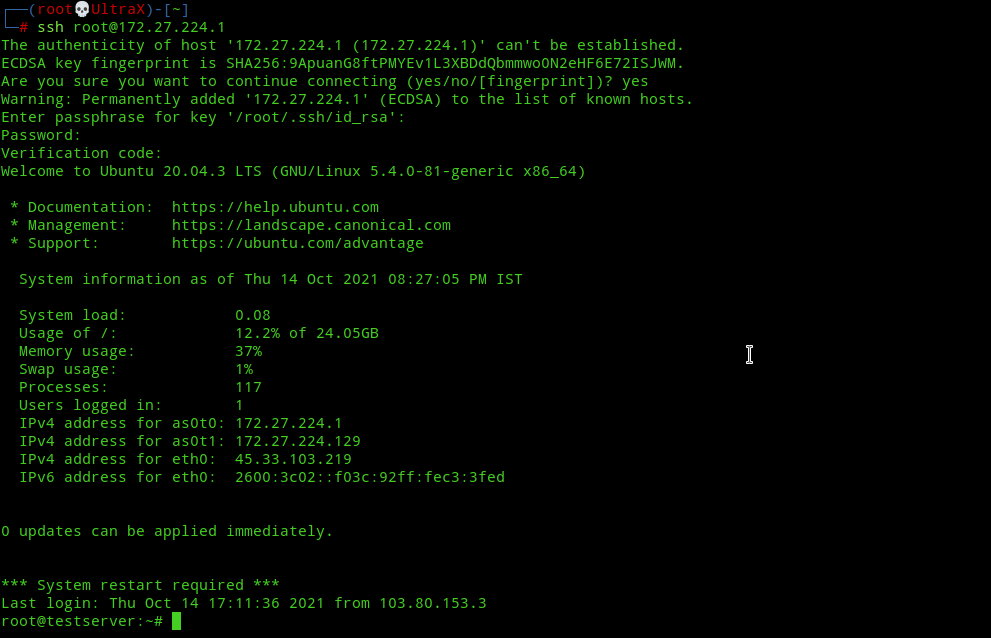
Note:- I’ve enabled 2FA alongwith key-based auth for my SSH connection. If you want to learn how to then refer to this post.
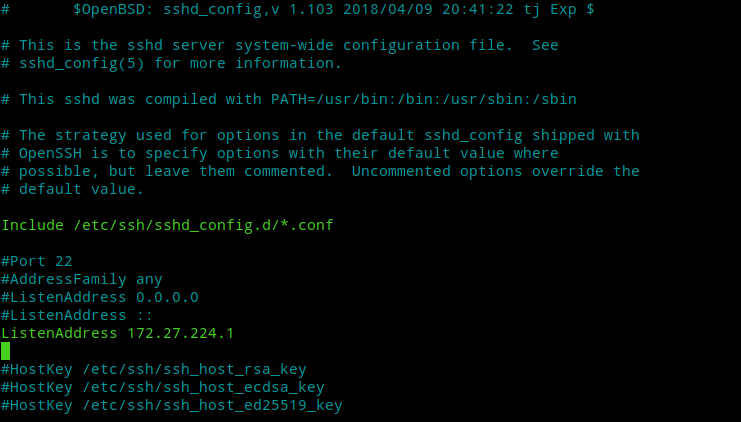
Now that we know how to SSH through our openvpn connection we can prevent SSH from listening on all interfaces, i.e, 0.0.0.0 and make it listen only on our vpn interface by editing our /etc/ssh/sshd_config file. This way SSH service will be restricted to our VPN connection only and will be invisible to outside world. To do this, open /etc/ssh/sshd_config file in your favourite editor and add ListenAddress 172.27.224.1 on a new line as shown in the following image:-
Save and close the file. After that restart SSH daemon to apply our configuration changes.
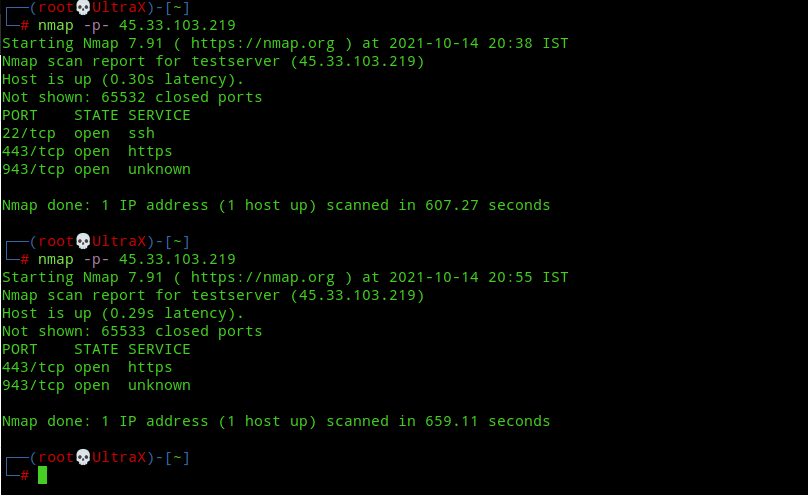
systemctl restart sshd.serviceNext check with netstat -tulnp again and you’ll find that SSH is now listening on 172.27.224.1:22 which means SSH service is only visible to our vpn connection! The following image shows two nmap scans done before and after editing the sshd_config file. You can clearly see that the second nmap scan doesn’t show port 22 as open.
Restricting all services to one port
As you may have noticed our current setup opens up a bunch of ports by default. But if you scan my website then you’ll find there is only one port open, i.e, Port 443. OpenVPN server comes with an option called port-share with which OpenVPN can share the tcp port 443 with another service. While this is great for port sharing with protocols like HTTP/HTTPS but what if we wanted to add a bunch of popular services to our server which run on different ports? I don’t think that’s currently possible to do with the port-share option. So how to make different services share the same port. The answer:-
SSLH – A protocol demultiplexer
SSLH accepts connections on a specified port and forwards them further based on tests performed on the first data packet sent by the remote client.
In short, SSLH will probe the first incoming data packet of a particular service and if recognized forward it to that particular service running in our server. Cool, isn’t it? In my next post I’ll cover Transparent SSLH and how to implement it in our server. So far I’ve covered only foundational networking concepts but in the next post we’ll look into slightly advanced topics like SSLH and firewall(iptables) rules.
P.S:- First of all, forgive me for all the typos and punctuation errors. This post took me an entire day to write and I didn’t wanted to go through everything again. Also if I’ve missed something then don’t hesitate to leave a comment, I’ll appreciate that. Further, in this post I’ve taken the assumption that the reader has experience on basic command line usage and knows how to edit files in terminal. Sorry, but this guide is not for complete beginners. 🙁 I also wanted to show how to use command line to do all the configuration that we did via Access Server GUI but I was afraid this post would get too long and people won’t read. Also, we’re currently doing all the setup with the root user but in the future when everything is setup we’ll add a new user and disable SSH login for root user. Peace!
Everything is very open with a really clear description of the
challenges. It was definitely informative. Your
website is useful. Thank you for sharing!
Thanks. (: