How to setup 2FA for SSH in Ubuntu
Two factor authentication is so ubiquitous now-a-days that almost every major service provides a way to enable 2FA for its users. So it means not enabling 2FA for SSH connection to our servers, when we’ve the option to do so, is not a wise idea. Today, I’ll show how to enable 2FA for SSH in Ubuntu server and as a bonus I’ll tell how I personally secure the SSH login to my server.
Topics Covered
Setting up 2FA for SSH in Ubuntu Server
How I secure SSH Login to my server
Setting up 2FA for SSH
Setting up Two Factor Authentication in Ubuntu is as simple as installing a package and doing small edits to two config files. First, install the google-authenticator package by typing the following command:-
Installing the Google Authenticator PAM module
apt install libpam-google-authenticator
After installation is finished, open up /etc/pam.d/sshd file in your favourite text editor and append the following line:-
Enabling the Google Authenticator PAM module
auth required pam_google_authenticator.so
Alternatively, you can use the following command to append the line for you:-
echo "auth required pam_google_authenticator.so" >> /etc/pam.d/sshd
After adding the line, close and save the file. Next open up the /etc/ssh/sshd_config file and find the following line:-
ChallengeResponseAuthentication no
Change it to:-
ChallengeResponseAuthentication yes
Alternatively, you can use the following command to edit the line for you:-
sed -i 's/ChallengeResponseAuthentication no/ChallengeResponseAuthentication yes/g' /etc/ssh/sshd_config
Save and close the file. Note, in addition to this you should also check whether the UsePAM configuration is set to yes or not. If it is set to no or its commented out, then uncomment/set it to yes so that Google Authenticator PAM module works. Next, to configure the Google Authenticator use the following command:-
google-authenticator
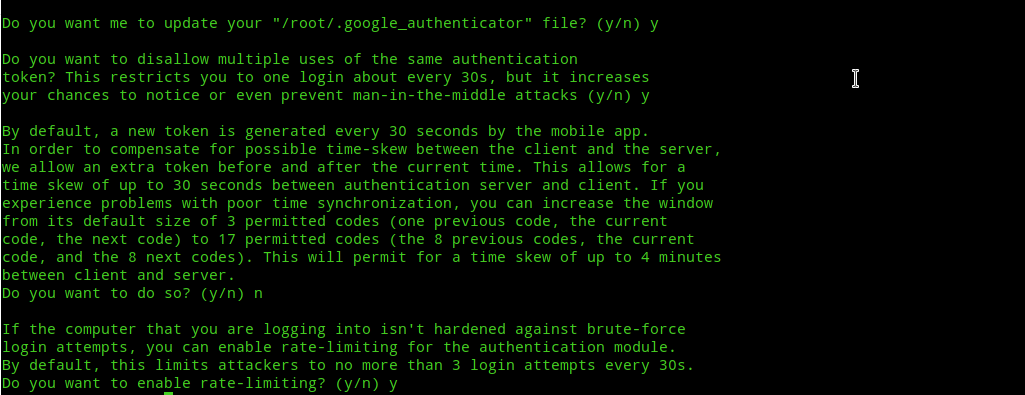
Next you’ll be asked some questions. Answer the questions as follows:-
Do you want authentication tokens to be time-based (y/n) – yes
Do you want me to update your “/user/.google_authenticator” file? – yes
Do you want to disallow multiple uses of the same authentication token? (y/n) – yes
Do you want to increase the time skew? (y/n) – no
Do you want to enable rate-limiting? (y/n) – yes
Next, open your authenticator app. Then, Scan the big QR code displayed. If you were unable to scan the code, then you can manually enter the secret key mentioned below the QR code.
Note:- I use Microsoft Authenticator because it allows syncing of all the TOTP enabled accounts to cloud, so that even if you lose your device you can get access to all of them by signing in to another device.
Note2:- You must backup the emergency scratch codes and the secret key to another place so that in case you lose your device you can restore the login in case you don’t have sync enabled for your TOTP. I recently faced a situation where I accidently overwrote the TOTP entry in authenticator app with another entry. I had kept an encrypted backup of the secret key and was successfully able to restore/recreate my TOTP entry in authenticator app!
Finally, restart the SSH service to apply your configuration changes:-
systemctl restart sshd.service
Next logout of your server and try to SSH into it. After entering your password, you’ll get a verification code prompt like this:-

And so, we’ve enable Two Factor Authentication for our Ubuntu Server. 🙂
How I secure SSH login to my server
I like to follow the best security practices. So, in addition to having 2FA enabled for SSH, I use key-based authentication. As a result, unless an attacker has access to my SSH id_rsa file, the superstrong passphrase I use to encrypt it, my server user password and finally my unlocked Smartphone for the TOTP he won’t be able to login to my server. That’s literally a 4-step verification! 😎 And to add salt to the wound of an attacker, in a future post I’ll show you how to add another step, i.e, restrict SSH login to VPN connection only!
So, to implement key-based authentication in addition to 2FA you first need to generate SSH keys with the following command:-
Generate SSH keys
ssh-keygen
I recommend setting a password while generating the keys. If you’ve already setup key-based authentication for SSH, then you can set a password with the following command:-
Setting a passphrase for SSH keys
ssh-keygen -p
Next, we need to copy our SSH public key(id_rsa.pub) to the server so that it gets added to authorized_keys file. If you haven’t already copied you public key to your server, to copy your public key to the server use the following command:-
Copying public key to the server
ssh-copy-id user@server

Note:- I assume you’ve already enabled 2FA and doing the above would temporarily disable the 2FA and only the public key and its passphrase will be needed to login. To prevent this from happening in the future we’ve to add some extra configuration.
Next, to enable both 2FA and key-based authentication we need to edit the /etc/ssh/sshd_config file in our server and add the following line:-
AuthenticationMethods publickey,keyboard-interactive
The sshd_config file should finally look something like this:-
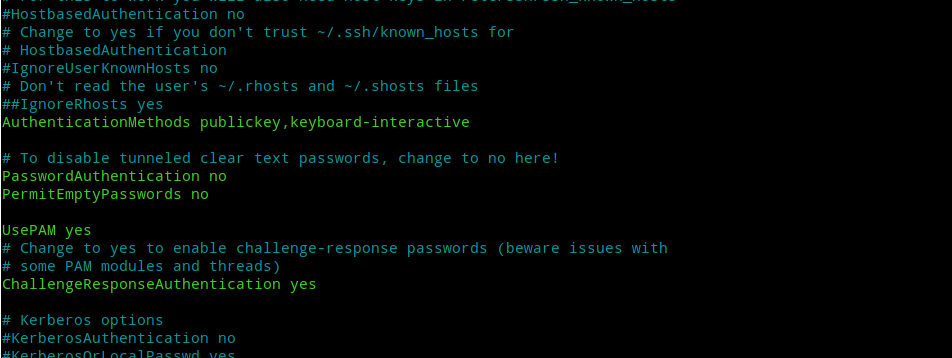
Now that everything is set, its time to restart ssh to apply our configuration.
systemctl restart sshd.service
Now, the next time you try to login you will get prompts for SSH key password, server user password and 2FA code like this:-

If you’ve successfully implemented both the 2FA and key-based auth, then well done! Your SSH login is now more secure than ever!
Additional tips
- Use a password manager to create a strong password for SSH keys.
- Save the password in the password manager under a suitable name.
- Set the password manager to clear the clipboard every few seconds/minutes as convenient.
- Finally, don’t forget to have a backup plan so that in the worst case scenario you can still login to the server. In a future post I’ll show you other ways to login in case you lose access to all the primary methods.
- Stay secure, stay safe.
P.S:- Man, I’ve never thought that writing a technical blog post is so time-consuming. It took me nearly six hours to write a simple post like this. Now that I think of all the highly technical things I said in my first post, I’m afraid will I even be able to complete what I’ve started. Anyways, will see how far this goes. Peace!