SSLH Transparent Proxy for Apache, OpenVPN and SSH
Sometimes while working in corporate environments you feel the need to connect to your own vpn server or need to SSH into your server, but due to corporate restrictions port 1194(openvpn) and port 22(SSH) won’t be accessible. Also, for security reasons you don’t want your server to expose these ports to the internet, trust me for the sake of your auth.log you don’t want port 22 open to the world.
In such cases, we’d like to have OpenVPN and SSH run on a separate port that’s almost always accessible and provides security. For example, port 443. But how to make SSH, OpenVPN and Apache/Nginx listen on the same port? To solve this problem, today we’ll discuss a tool called SSLH. If you want to get started with Installing OpenVPN Access server, than you can follow previous guide on how to get started. If you’re using self hosted server, then it’s fine but if not, then you can rent a cheap VPS from Linode. They’ve a $100 credit for 60 days promotion going on if you signup via this link, which I think is a no-brainer as it’s free!
What we will learn today
- What is SSLH?
- Transparent SSLH
- Switching OpenVPN to TCP only mode
- Installing and configuring Apache and SSLH
- Making SSLH persistent and testing our config
- Closing port 943
- What’s next?
What is SSLH?
From SSLH manpage:-
NAME
       sslh - protocol demultiplexer

DESCRIPTION
       sslh accepts connections on specified ports, and forwards them further based on tests performed on the first data packet sent by the remote client.
In simple terms, this means SSLH will act as a proxy server listening on a specific port and forward incoming connections to the respective services running on our server. The way SSLH achieves this is by probing the first data packets of incoming connections(like HTTPS, SSH, OPENVPN etc.) and if it recognises the service, then it forwards to the respective service running on our server.
For example:- We’ll make our Apache webserver to listen on port 4443 and bind SSLH to port 443. Then we change the SSLH config to forward HTTPS connections to Apache webserver. SSLH will analyze incoming traffic on port 443 and if it finds that the traffic to be HTTPS it then forwards it to Apache webserver running on port 4443. Same principle can also be applied for SSH and OpenVPN also.
Transparent SSLH
There is already a lot of resources on difference between SSLH non-transparent and transparent mode and this link describes it very well. So I’m just going the list the main disadvantage of both.
The first time I setup SSLH was using the non-transparent mode. It was very easy to setup. The only downside to this was logs. Every time a client connects to our server Apache logs would show as if the connection is from localhost(127.0.0.1).

This is where SSLH transparent mode helps. In transparent mode the connections from clients will look as if the request was made directly to our webserver, i.e, SSLH will act completely transparent. The downside here is that for our server response to reach the client we’ve to create new ip rules and modify iptables rules so that our server response gets routed via SSLH. So, let’s see Transparent SSLH in action.
Switching OpenVPN to TCP only mode
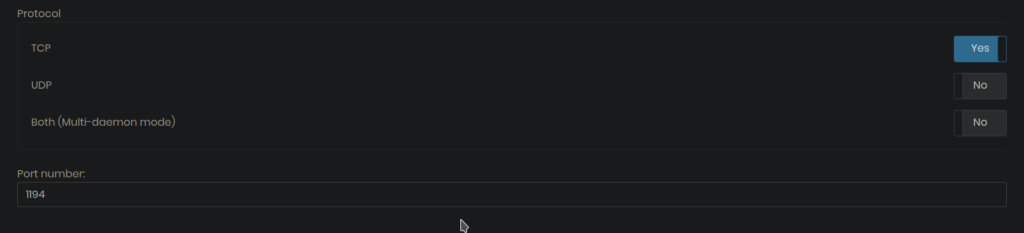
By default, OpenVPN Access Server listens on TCP Port 443 and UDP port 1194. We need port 443 free for SSLH to listen on. As we can make only make two simultaneous connections to our OpenVPN server we don’t need to run OpenVPN server in multi-daemon mode and disabling UDP/TCP mode will also save us system resources.
Login to Admin Web UI of OpenVPN AS and go to CONFIGURATION –> Network Settings –> Protocol and enable the TCP switch and change the port number to 1194. Click on Save Settings and then Update Running Server.
You can also achieve the above through command line by using the following commands:-
cd /usr/local/openvpn_as/scripts/
./sacli --key "vpn.daemon.0.listen.protocol" --value "tcp" ConfigPut
Using OpenVPN scripts
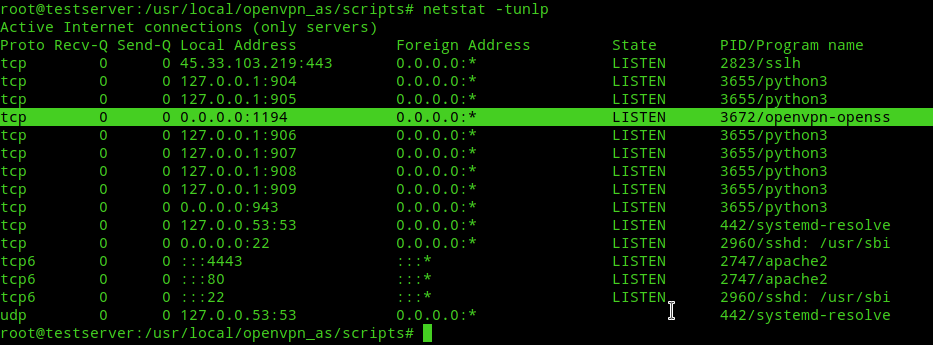
Next check on your server whether openvpn is running under tcp or not.
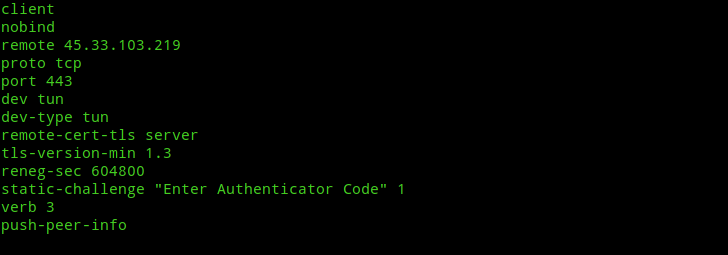
Note:- You’ve to also edit any *.ovpn vpn profiles you’ve downloaded and change proto udp to proto tcp and change openvpn port to 443.
Installing and configuring Apache and SSLH
First install Apache and SSLH with the following command:-
apt install apache2 sslhNote:- Select standalone mode when prompted while installing SSLH.
Next, install Let’s Encrypt’s Certbot tool to install SSL certificates for your website.
snap install certbotInstalling Certbot in Ubuntu
Note:- You need to update your DNS records with your domain provider. If you’re using Linode, then you can use this link to learn how to add a domain name to your server.
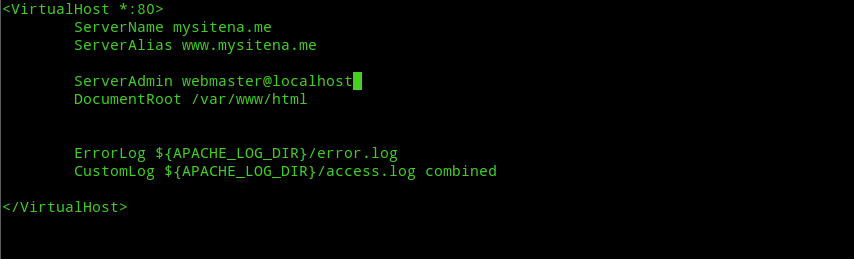
Next, edit /etc/apache2/sites-available/000-default.conf vhost file and add your Domain name like the following image.
Now let’s get SSL certificates for our website. After running the command below follow the prompts to install SSL certificates on your server.
certbot --apacheNote:- In a future post, I’ll write about the SSL/TLS best security practices and how to implement them in our server to get A+ in ssllabs SSL test. You can check my server rating here.
Now we need to change Apache SSL listening port and change all the vhost directives enabled in our server.
Edit /etc/apache2/ports.conf and change it to as follows:-
Listen 80

<IfModule ssl_module>
        Listen 4443
</IfModule>

<IfModule mod_gnutls.c>
        Listen 4443
</IfModule>
Edit /etc/apache2/sites-available/000-default-le-ssl.conf and change:-
<VirtualHost *:443>
    ...
</VirtualHost>
to:
<VirtualHost *:4443>
    ...
</VirtualHost>
Note:- the file 000-default-le-ssl.conf is created by Certbot to store its SSL configuration.
SSLH configuration is done through /etc/default/sslh file. Edit it to look like this:-

/etc/default/sslh# Default options for sslh initscript
# sourced by /etc/init.d/sslh
# binary to use: forked (sslh) or single-thread (sslh-select) version
# systemd users: don't forget to modify /lib/systemd/system/sslh.service
DAEMON=/usr/sbin/sslh
DAEMON_OPTS="--user sslh --transparent --listen <server-ip>:443 --tls <server-ip>:4443 --openvpn <server-ip>:1194 --ssh <server-ip>:22 --http <server-ip>:80 --pidfile /var/run/sslh/sslh.pid"
Note:- The <server-ip> must be replaced with your server’s IP address. SSLH checks for protocols in the order mentioned in this file so set the protocol order to your preference. Also, you can use a domain name in the place of <server-ip> which resolves to the server’s IP address, this also helps in ipv6 address resolution in case you want ipv6 support.
Now, we need to modify iptables rules for proper routing of outgoing connections so that Transparent mode will work. Create a file named transparent-sslh with the following content and then save and close the file:-
#!/bin/bash

iptables -t mangle -N SSLH
iptables -t mangle -A OUTPUT -p tcp -o eth0 --sport 4443 -j SSLH
iptables -t mangle -A OUTPUT -p tcp -o eth0 --sport 1194 -j SSLH
iptables -t mangle -A OUTPUT -p tcp -o eth0 --sport 80 -j SSLH
iptables -t mangle -A OUTPUT -p tcp -o eth0 --sport 22 -j SSLH
iptables -t mangle -A SSLH -j MARK --set-mark 0x1
iptables -t mangle -A SSLH -j ACCEPT
ip rule add fwmark 0x1 lookup 100
ip route add local 0.0.0.0/0 dev lo table 100

ip6tables -t mangle -N SSLH
ip6tables -t mangle -A OUTPUT -p tcp -o eth0 --sport 4443 -j SSLH
ip6tables -t mangle -A OUTPUT -p tcp -o eth0 --sport 1194 -j SSLH
ip6tables -t mangle -A OUTPUT -p tcp -o eth0 --sport 80 -j SSLH
ip6tables -t mangle -A OUTPUT -p tcp -o eth0 --sport 22 -j SSLH
ip6tables -t mangle -A SSLH -j MARK --set-mark 0x1
ip6tables -t mangle -A SSLH -j ACCEPT
ip -6 rule add fwmark 0x1 lookup 100
ip -6 route add local ::/0 dev lo table 100- The first iptables rule creates a chain called SSLH and adds it to the mangle table
- The 2nd, 3rd, 4th and 5th iptables rules append a rule to the mangle table where any outgoing(-A OUTPUT) tcp packet(-p tcp) through our main network interface(-o eth0) from source ports(–sport) 4443,1194,80,22 on our server where Apache, OpenVPN and SSH are listening should jump(-j) to our target chain SSLH if the packet matches the rule. For e.g, if an outgoing tcp packet from source port 4443 on our server is going via eth0 interface, then it gets forwarded to our SSLH chain.
- The next rule sets a mark of 0x1 on anything in the SSLH chain.
- The next rule makes anything in the SSLH chain to jump to ACCEPT target which allows the packet to successfully move to its destination.
- The next ip rule selects the routing table 100 instead of the main routing table for packets marked 0x1.
- The next ip rule tells that any packet that arrives in the routing table 100 should be redirected to the loopback interface on the SSLH server, where the SSLH process will rewrite its source IP and port and send it out.
- The remaining lines are the same as above but for ipv6.
Note:- If anyone thinks this above explanation is incorrect then please leave a comment with the explanation as to why I am wrong. I’ll appreciate that.
Now, add the transparent-sslh script to your server PATH.
cp transparent-sslh /usr/local/bin/ Next, make it executable:-
chmod +x /usr/local/bin/transparent-sslhNow executing this script will set the iptables rules for us. The downside is these iptables rules won’t survive a reboot and we need to make them persistent.
Making SSLH iptables rules persistent and Testing our configuration
Create a file called transparent-sslh.service and paste the following code:-
vi transparent-sslh.service[Unit]
Description=transparent-sslh
Wants=network-online.target
After=network-online.target
[Service]
Type=simple
ExecStart=/usr/local/bin/transparent-sslh
[Install]
WantedBy=multi-user.targetSave and close the file. What this file does is after a reboot when our server’s network interfaces become online it executes our transparent-sslh bash script and applies the iptables rules for us. Now, copy the service file to /etc/systemd/system to create a systemd service.
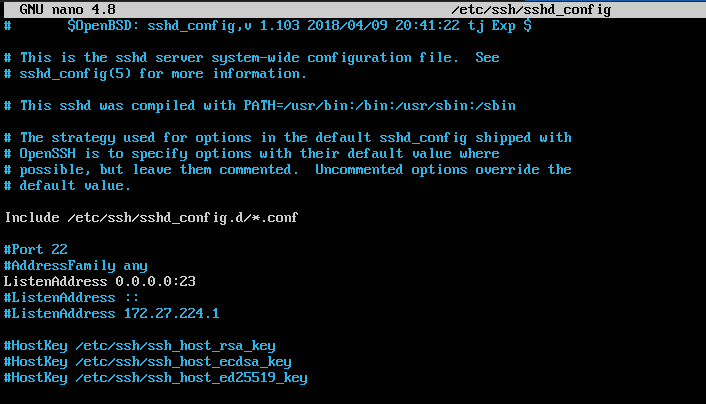
cp transparent-sslh.service /etc/systemd/system/IMPORTANT:- If you’re logged in via SSH to your server on port 22, then you should change your SSH server listening port or your connection will be closed on starting transparent-sslh.service and you can’t login again via SSH. To do that, edit /etc/ssh/sshd_config file and set the ListenAddress like the image below and choose a random port of your liking.
Next restart SSH Daemon and log out and log back in via port 23 or just use another terminal to login.
systemctl restart sshd.service

exit

ssh user@your-server -p 23
Now stop Apache and SSLH if they’re running.
systemctl stop apache2

systemctl stop sslh
Now, start and enable the transparent-sslh.service.
systemctl daemon-reload

systemctl start transparent-sslh.service

systemctl enable transparent-sslh.service
Now finally restart Apache and SSLH and test!
systemctl  restart apache2

systemctl restart sslh
Now, change the SSH server port back to 22 by commenting out the line we edited earlier and then restarting SSH Daemon.

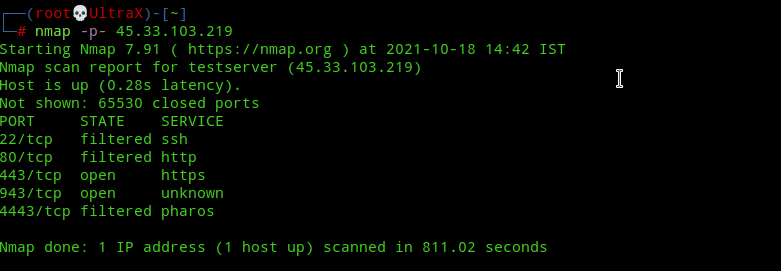
systemctl restart sshd.serviceThe following image is of a Nmap scan done before enabling Transparent SSLH.
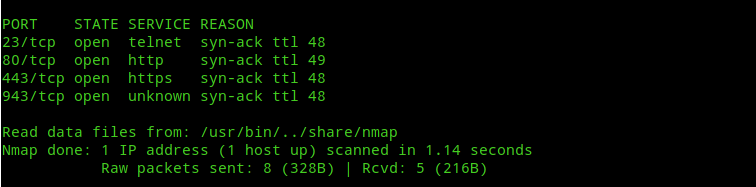
Nmap scan after enabling Transparent SSLH.
Closing Port 943
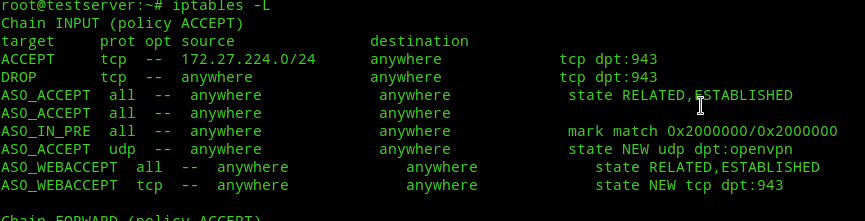
Our nmap scan shows port 943 and 443 as open. The port 943 is where OpenVPN AS Admin and Client Web UIs are running if you’ve installed OpenVPN AS following my previous guide. As we’ll rarely use the Web UIs again and we don’t want the world to see whats running on port 943 we can just add an iptables rule to restrict access to OpenVPN Web UI to our VPN connection only! To do that execute the following commands:-
iptables -I INPUT -p tcp --dport 943 -j DROP

iptables -I INPUT -p tcp -s 172.27.224.0/24 --dport 943 -j ACCEPT
The first command inserts a rule to the top where any incoming connection on tcp port 943 is dropped.
The second command inserts a rule to the top(above the previous rule) where only incoming connection on tcp port 943 from 172.27.224.0/24 subnet, which is our vpn subnet, is accepted!
Note:- You can also number the INPUT value to set the order of the above rules
Now, check with iptables -L and you’ll see that these rules would’ve been added to the top.
Now, if we run Nmap again we’ll see that port 943 is filtered.
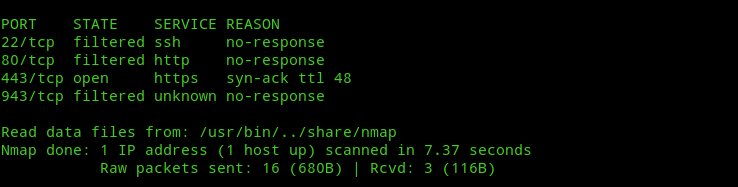
Now, try to browse to Admin UI and you would see connection getting timed-out. Next try to connect with VPN turned on and you’ll be able to login to Admin Web UI. Mission Successful!!
What’s next?
Next, we’re going to do the standard LAMP installation and install Nextcloud with the industry best security practices which’ll make it real hard for hackers to compromise our server.