
Tuning Apache, PHP and MySQL for better performance
Today we’ll dive into improving performance and speeding up Apache WebServer while tuning PHP-FPM and MySQL for better performance of our installed WebApps. We’ll be doing a lot of server side optimizations and won’t be using any kind of plugins or apps provided by Nextcloud or WordPress. For e.g, my WordPress installation doesn’t use any kind of optimization plugin or theme but even my heaviest blog post performs really well on GTmetrix and PageSpeed Insights performance tests.
What we’ll learn today
- Enable HTTP/2 support for Apache
- Install mod_pagespeed for disk based caching
- PHP-FPM tuning for better performance
- Enable HTTP compression and Browser caching
- Configuring PHP Opcache
- Tuning MySQL server for better db performance
- Conclusion
Enable HTTP/2 support for Apache
Prerequisites
Before proceeding to enable HTTP/2 make sure your server meets the following conditions:-
- HTTPS is enabled.
- PHP-FPM and mpm_event module enabled with mod_php and mpm_prefork disabled. If you’ve followed my previous guide on installing Nextcloud, then you’d already have met this condition.
- Latest version of Apache installed.
Enabling HTTP/2 support system-wide
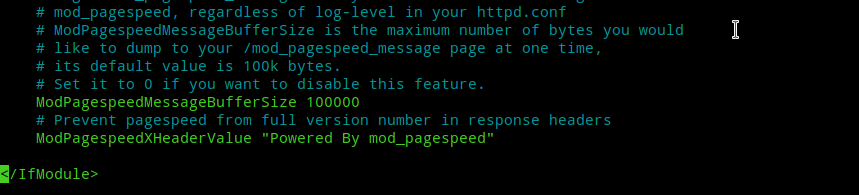
After you meet all the above prerequisites enable HTTP/2 module for Apache using the following command:-
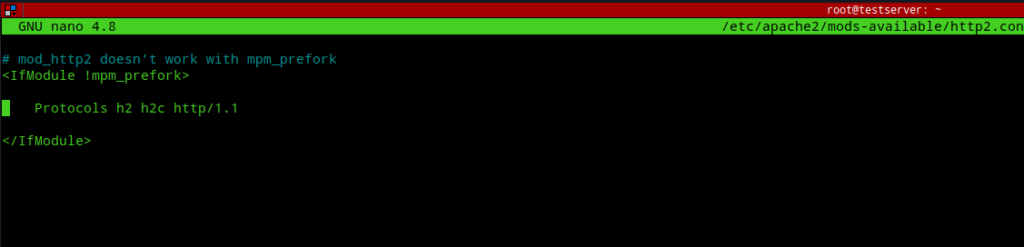
a2enmod http2Next, edit /etc/apache2/mods-available/http2.conf to look like the following image:-
Now, restart Apache to apply the changes:-
systemctl restart apache2.serviceNext, to check whether HTTP/2 support for your website is enabled use the following command:-
curl -I --http2 -s https://yourdomain.com/ | grep HTTPThe following is an image taken before and after enabling http2 support.

Install mod_pagespeed for disk based caching
Memory caching like memcached, redis etc. while being many times faster over disk-based caching has a few disadvantages over the latter such as memory caches doesn’t survive across server reboots and will also be lost if the server crashes unexpectedly while with disk-based caching there is no such problems. Further, as one of our primary goal is to keep server cost down so paying extra money to increase server RAM for the memory caching is not an option for us. One of the best disk-based caching module is Google’s mod_pagespeed module which performs optimizations on HTML and Javascript code and reduces their sizes while at the same time caches them for speedier delivery from disk. To install and enable mod_pagespeed module we’ve to first add Google’s GPG keys so that our server’s package manager apt can verify any updates to the mod_pagespeed module. Use the following command to download and add Google’s GPG key to your server:-
wget -q -O – https://dl.google.com/linux/linux_signing_key.pub | sudo apt-key add –After that do a apt update and download the latest mod_pagespeed from Google:-
wget https://dl-ssl.google.com/dl/linux/direct/mod-pagespeed-stable_current_amd64.debNext, install the module and restart apache to enable it.
dpkg -i mod-pagespeed-stable_current_amd64.deb
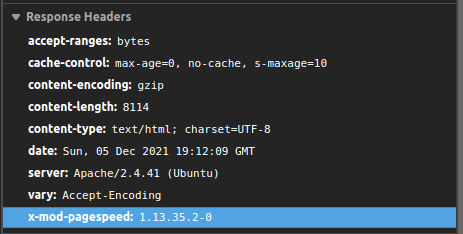
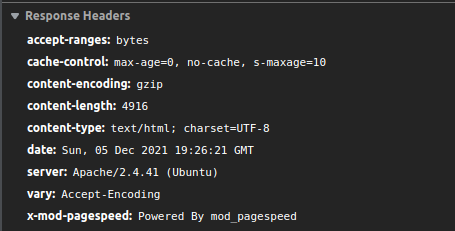
systemctl restart apache2Now, if you refresh your website and check the response headers in browser developer tools you’ll see that a new header called x-mod-pagespeed added indicating mod_pagespeed is enabled for your server.
The only problem here is that it shows the complete version number in the header which can be a security issue. So, to disable the version number edit the /etc/apache2/mods-available/pagespeed.conf file and add a directive ModPagespeedXHeaderValue and set its value to something appropriate like the image below.
Next, restart apache2 and check the response headers again and you’ll see that the version number is changed to the string you chose in pagespeed.conf.
Note:- In a future post I’ll explain how to hide Apache version and server name.
PHP-FPM tuning for better performance
By default each simultaneous request for a particular element of our webserver is handled by a different PHP-FPM process. So allowing more PHP-FPM processes to run in parallel for handling requests will increase performance of our webserver dramatically. Depending upon how much traffic your site generates this can make a huge difference. To achieve this we need to configure our PHP-FPM pools accordingly. To calculate right values for your system visit this link. For e.g, my main server has only 2GB RAM so I adjusted the values as follows:-
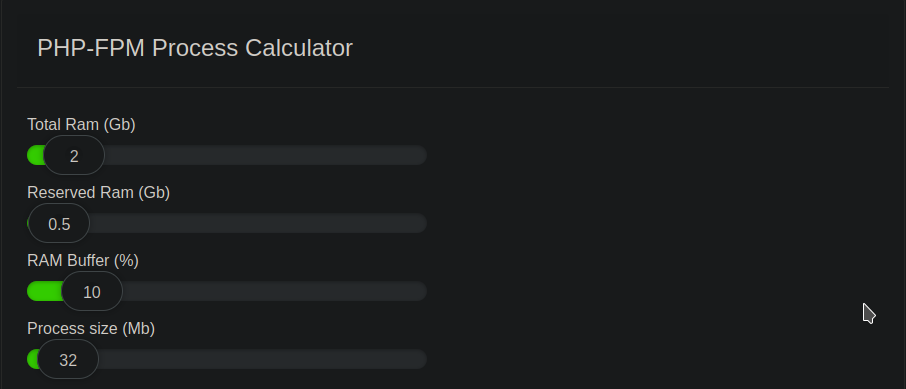
Adjust the above values depending upon your server hardware. After getting the required values edit the PHP-FPM pools configuration files /etc/php/7.4/fpm/pool.d/fpm-nextcloud.conf and /etc/php/7.4/fpm/pool.d/fpm-wordpress.conf for Nextcloud and WordPress and change the following values:-
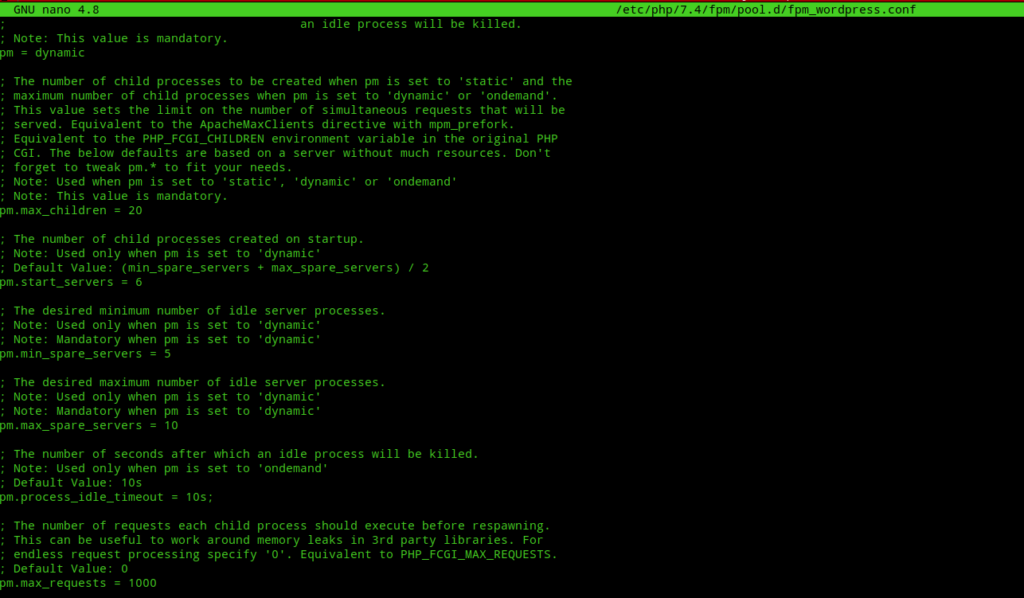
pm.max_children
pm.start_servers
pm.min_spare_servers
pm.max_spare_servers
Note:- I’ve assumed that you’ve enabled PHP-FPM pools following my previous guide. If not, edit your pool accordingly. Also, don’t change the value of process manager pm = dynamic setting.
I don’t use my Nextcloud server quite often so I adjusted the above values to give priority to my WordPress blog. My adjusted configs for wordpress looks like this:-
Note:- These values may be completely different based on your hardware. Refer the link and adjust the values shown between your multisite install as per your preference.
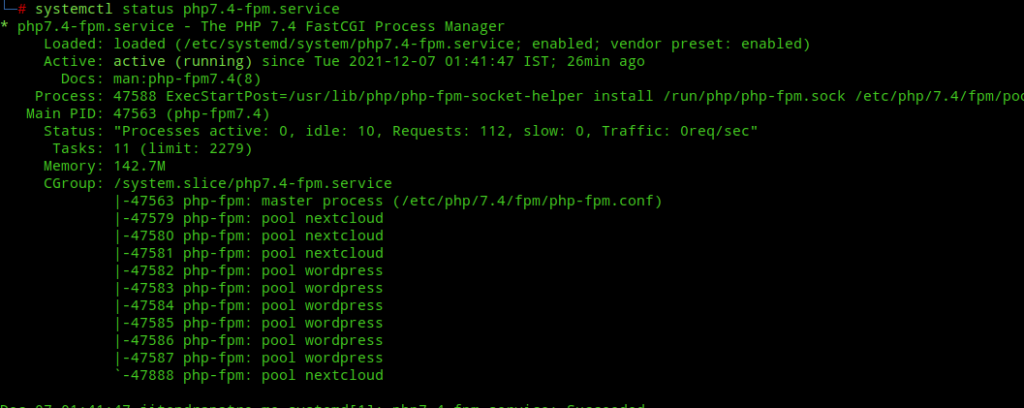
After changing the pool configuration restart php-fpm service to apply the changes.
systemctl restart php7.4-fpm.serviceNext, if you’ll check the status of the php7.4-fpm.service you’ll see that extra php-fpm processes are running as per the configuration.
Enable HTTP compression and Browser caching
HTTP compression
HTTP compression is the process of reducing the size of server assests like plain text, html, images, css, scripts, fonts etc. by using compression algorithms for faster transmission of data to clients. The most popular compression algorithm for web is GZIP. The GZIP compression algorithm is supported by all modern browsers but it is not enabled by default in Apache Webserver. To enable GZIP compression on Apache you need to enable mod_deflate and mod_filter modules and configure them with the right directive. Use the following command to enable them:-
a2enmod deflate filterNext, edit /etc/apache2/mods-available/deflate.conf and replace the existing code with the following code:-
<IfModule mod_deflate.c>
        <IfModule mod_filter.c>
                AddOutputFilterByType DEFLATE application/x-javascript application/javascript application/ecmascript
                AddOutputFilterByType DEFLATE application/rss+xml
                AddOutputFilterByType DEFLATE application/xml
                AddOutputFilterByType DEFLATE application/vnd.ms-fontobject
                AddOutputFilterByType DEFLATE application/x-font
                AddOutputFilterByType DEFLATE application/x-font-opentype
                AddOutputFilterByType DEFLATE application/x-font-otf
                AddOutputFilterByType DEFLATE application/x-font-truetype
                AddOutputFilterByType DEFLATE application/x-font-ttf
                AddOutputFilterByType DEFLATE application/x-javascript
                AddOutputFilterByType DEFLATE application/xhtml+xml
                AddOutputFilterByType DEFLATE font/opentype
                AddOutputFilterByType DEFLATE font/otf
                AddOutputFilterByType DEFLATE font/ttf
                AddOutputFilterByType DEFLATE image/svg+xml
                AddOutputFilterByType DEFLATE image/x-icon
                AddOutputFilterByType DEFLATE text/css
                AddOutputFilterByType DEFLATE text/html
                AddOutputFilterByType DEFLATE text/javascript
                AddOutputFilterByType DEFLATE text/plain
                AddOutputFilterByType DEFLATE text/xml
        </IfModule>
</IfModule>
Save and close the file. Next restart apache to apply the new configuration. Next, do a HTTP compression test by visiting this link.
Browser caching
Browser caching is feature via which most recently browsed webpages are stored temporarily in web browsers. Browsers generally cache “static assets” or assets that don’t change upon next visits. What to cache and for how long to cache the assets in browsers is determined by the Webserver/Website. In Apache we can enable browser caching server-wide for all our webapps. To enable browser caching we need to enable two apache modules, i.e, mod_headers and mod_expires. Enable them by using the following command:-
a2enmod headers expiresNext, to enable browser caching system-wide add the following configuration to your /etc/apache2/apache2.conf:-
<IfModule mod_expires.c>
  ExpiresActive On
  ExpiresByType text/html "access 600 seconds"
  ExpiresByType application/xhtml+xml "access 600 seconds"
  ExpiresByType text/css "access 1 month"
  ExpiresByType text/javascript "access 1 month"
  ExpiresByType text/x-javascript "access 1 month"
  ExpiresByType application/javascript "access 1 month"
  ExpiresByType application/x-javascript "access 1 month"
  ExpiresByType application/x-shockwave-flash "access 1 month"
  ExpiresByType application/pdf "access 1 month"
  ExpiresByType image/x-icon "access 1 year"
  ExpiresByType image/jpg "access 1 year"
  ExpiresByType image/jpeg "access 1 year"
  ExpiresByType image/png "access 1 year"
  ExpiresByType image/gif "access 1 year"
  ExpiresByType image/ico "access 1 year"
  ExpiresByType image/woff "access 1 year"
  ExpiresByType image/woff2 "access 1 year"
  ExpiresDefault "access 1 month"
</IfModule>
Next restart apache to apply the configuration changes:-
systemctl restart apache2Next, visit this link to test whether browser caching is enabled or not.

Configuring PHP Opcache
According to php.net:-
OPcache improves PHP performance by storing precompiled script bytecode in shared memory, thereby removing the need for PHP to load and parse scripts on each request.
In short, when a user visits a webpage for first time the page gets loaded into memory and on subsequent visits to page its loads faster as its cached in memory. In PHP version 5.5 and later it is enabled by default. But to optimize it for best use I recommend using suggestions from this guide and changing the respective values in your php.ini file. Also, depending upon how your webserver is setup you may have to edit multiple php.ini files. To determine those files, use the following command:-
find /etc/php -name php.ini
Tuning MySQL server for better db performance
All WordPress contents including posts, comments, user profiles etc. gets stored in MySQL database. To retrieve data from the database WordPress makes SQL queries. The faster the SQL queries the faster the pages load. So a well configured and clean database can lead to a huge performance improvements in page load times resulting in enhanced end-user experience. Optimizing database performance can be achieved through many ways. But today we’ll optimize MySQL by editing MySQL configuration file based on the recommendation of mysqltuner.pl script. First download the script with the following command:-
wget http://mysqltuner.pl/ -O mysqltuner.plThen run mysqltuner.pl with the following command:-
perl mysqltuner.pl --host 127.0.0.1At the end of the script output there will be some recommendation like this:-
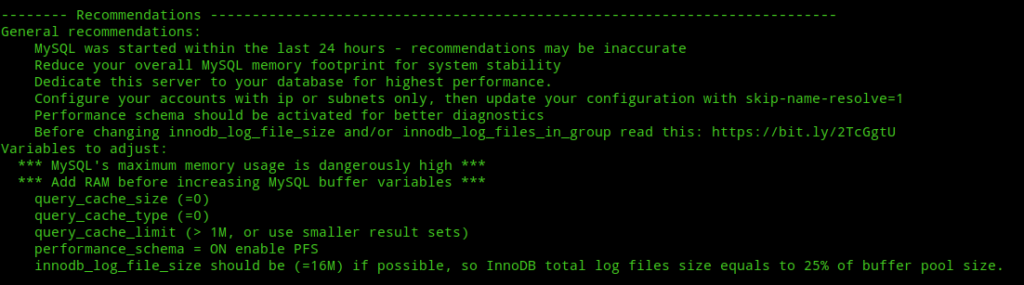
Next, edit /etc/mysql/my.cnf and add the recommendations to the file. For e.g, I added the following configuration to the file:-

Note:- Unless an exact value is specified do a bit research before changing each value.
If you’re using mariadb-server instead of mysql-server, then you should add the Sysschema database. The sysschema is a database which helps in keeping track of MySQL database usage statistics. This database will help mysqltuner.pl in giving better recommendations to improve database performance. To add the database use the following commands:-
curl "https://codeload.github.com/FromDual/mariadb-sys/zip/master" > mariadb-sys.zip
unzip mariadb-sys.zip
cd mariadb-sys-master/
mysql -u root -p < ./sys_10.sql
Conclusion
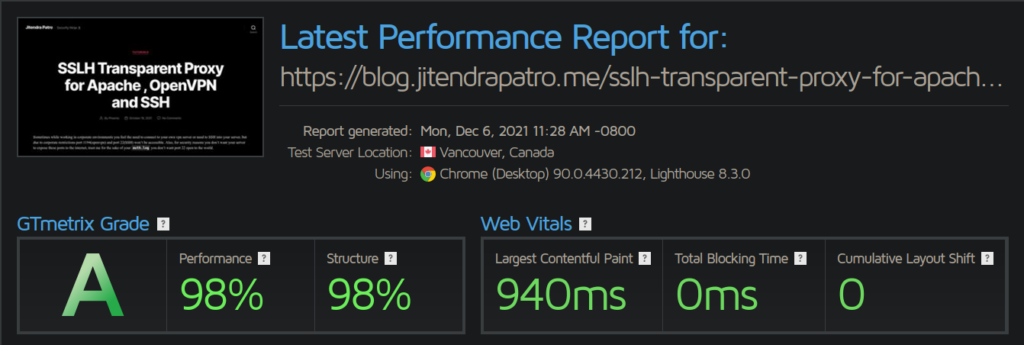
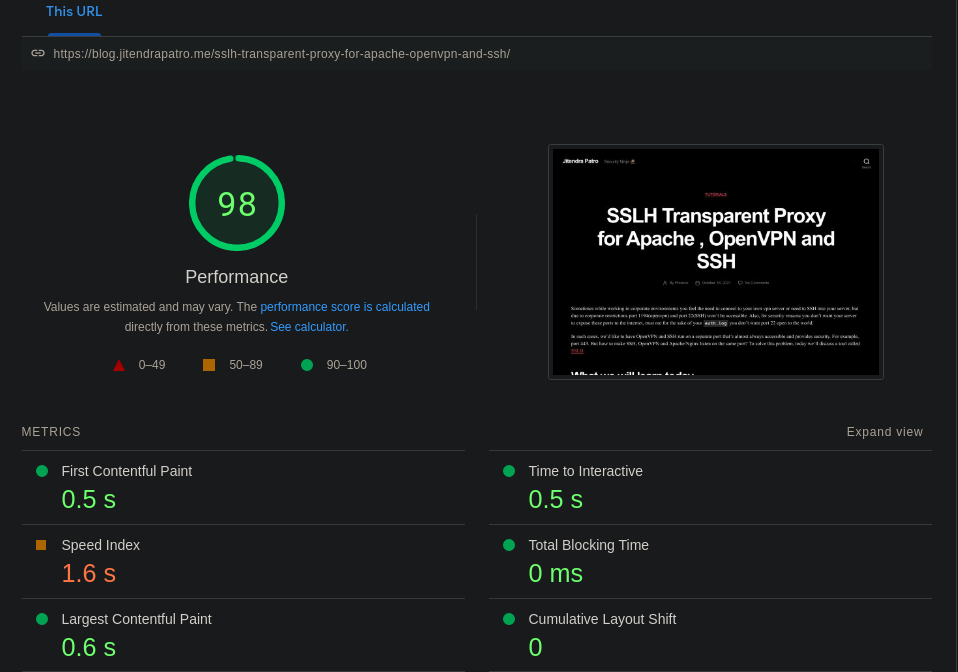
This is not a definitive guide on Apache optimization and there are a lot of other things you can optimize for your specific installation. I’ve done a few other minor optimizations(which I’ve not listed here) to my server to compensate for the performance loss due to heavy SSL encryption implemented on my server. Anyways, enabling the above configurations is guaranteed to give you an above 90% score on both GTmetrix and Pagespeed Insights. Happy tuning!