Deploying a Shadowsocks Server to GCP using Terraform
Introduction
Terraform is the most popular Infrastructure as code (IaC) tool available in the market. It supports more than a 1000 cloud providers and has some serious documentation for getting started with some of the top cloud service providers like AWS, Azure and GCP. I learned Terraform just two days ago and yesterday I decided to apply what I learnt into practice! Today, I was able to completely automate the deployment of a Shadowsocks proxy server to GCP using Terraform. The first time I created a Shadowsocks server on GCP was a week ago and it took me hours to set it up via Google Cloud Console(I was new to GCP). Now, I can deploy a Shadowsocks server to GCP within two minutes! Today, I’m going to show how to set up a Shadowsocks proxy server on GCP using my custom Terraform code. So, without further ado, let’s get started!
Table of Contents
- Sign up for a Google Cloud account
- Install gcloud CLI
- Login to gcloud CLI and create a project
- Link billing account to project , enable Compute Engine API and create a service account
- Install Terraform
- Deploy Shadowsocks server to GCP!
- Setup Shadowsocks client in Linux
- Conclusion
Sign up for a Google Cloud account
If you haven’t already, then I recommend to signup for a free Google Cloud account. The resources we will be deploying in this guide falls into the “always free” category of GCP and won’t cost you anything. After you signup for a free account, move on to the next step.
Note:- Google cloud is huge and is more tailored towards Enterprise customers than individual ones. If you look beyond the free tier, Google is offering a helluva lot of services which covers the needs of a wide range of business customers. In my calculation, it’ll take atleast between 15-30 days for someone like me to learn all or most of the Enterprise offerings of GCP.
Install gcloud CLI
First of all, we’ll be using command line for all of this guide and won’t be touching the Google Cloud console or any form of GUI whatsoever. As such, I expect you to have access to a Modern Debian-based Linux system with latest updates or if possible to a Debian-based Linux distro via WSL on Windows to follow along with this tutorial. Next, install the required packages for gcloud CLI using the following command:-
sudo apt-get install apt-transport-https ca-certificates gnupgNext, add the gcloud package repo to your apt sources with the following command:-
echo "deb [signed-by=/usr/share/keyrings/cloud.google.gpg] https://packages.cloud.google.com/apt cloud-sdk main" | sudo tee -a /etc/apt/sources.list.d/google-cloud-sdk.listNext, import the Google Cloud public key to your system with the following command:-
curl https://packages.cloud.google.com/apt/doc/apt-key.gpg | sudo apt-key --keyring /usr/share/keyrings/cloud.google.gpg add -Update your system sources and install gcloud CLI :-
sudo apt-get update && sudo apt-get install google-cloud-cli
Note:- If you’re facing any problems while installing gcloud CLI, then refer the Google official guide available here.
Login to gcloud CLI and create a project
Next, to check everything is okay use the following command. Note, when it asks you to log in choose no.
gcloud initNow, we’ll need some form of authentication to our GCP account to be able to deploy resources to GCP. To authenticate gcloud CLI, use the following command:-
gcloud auth login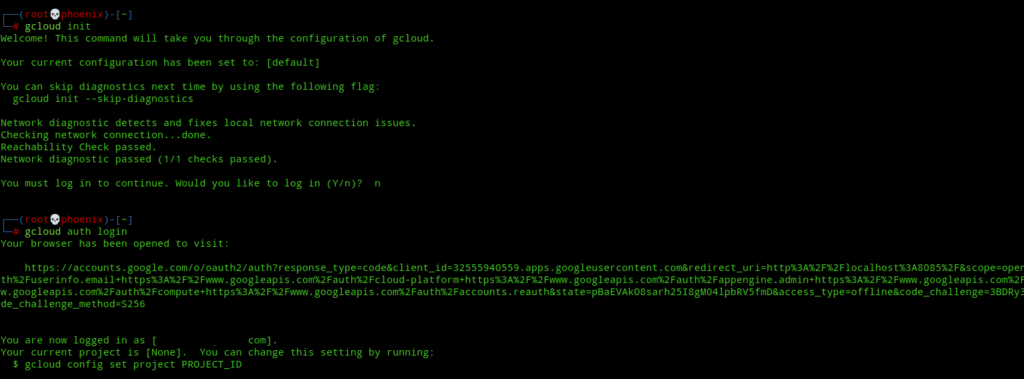
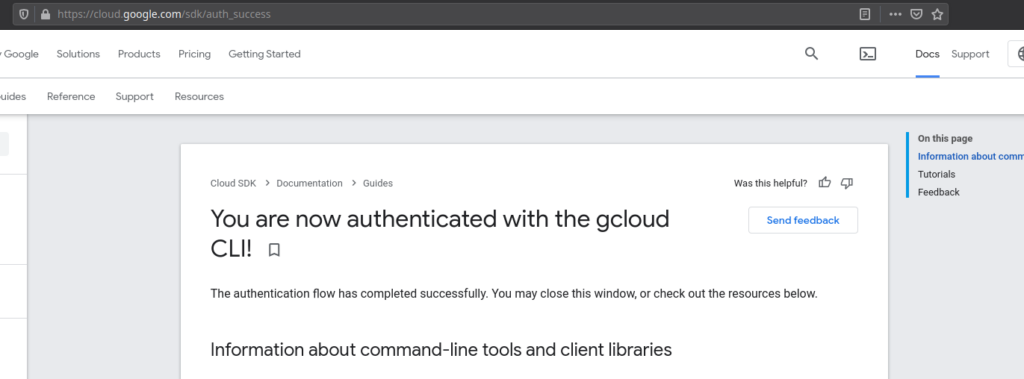
Now, the above command will open your browser and will ask you to login to your account. After login allow all permissions. Next, you’ll see a page like this if everything is successful.
Now, the next step is a very important part of this tutorial. Next, you’ve to create a Google Cloud Project to which we’ll deploy all our resources. The project name needs to be unique and must not be used elsewhere or gcloud will produce errors(see the image below). Next use the following command to create a Google cloud project and don’t forget to change <your-project-name> to a unique project name.
gcloud projects create <your-project-name> --name="Proxy Server" --labels=type="ss-proxy"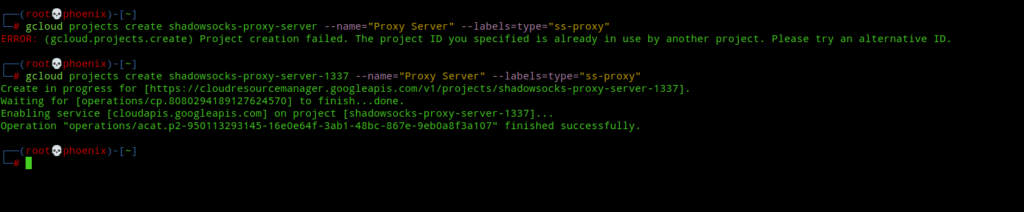
Now, once you’ve successfully created a project, take note of the “Project ID” that you set. You can see from the image above my “Project ID” is shadowsocks-proxy-server-1337. Next, we’ve to create two environment variables which are very important and will be used for the next steps. Next type the following commands and don’t forget to place your own “Project ID”:-
export PROJECT_ID="<your-project-name>"
export TF_VAR_project="<your-project-name>"
Note:- These environment variables won’t last a session restart. To save the variables permanently, add the above commands to your ~/.zshrc and ~/.bashrc files as necessary.
The first variable will be used with gcloud and the second variable will be used with Terraform. Next, set the default project for your gcloud CLI with the following command:-
gcloud config set project $PROJECT_IDNow, to check whether your project is updated or not use the following command:-
gcloud projects listLink billing account to project , enable Compute Engine API and create a service account
We need to enable billing for a project to be able to deploy resources into it in GCP. Don’t worry, you won’t be charged unless you deploy some very high cost resources that are out of the scope of this tutorial. So, to link your billing account to your project use the following command:-
gcloud alpha billing projects link $PROJECT_ID --billing-account `gcloud alpha billing accounts list | grep "True" | cut -d " " -f 1`
Next, enable Google Compute Engine API and Cloud Resource Manager API. The Compute Engine API allows us to create VM instances and deploy other resources while the Cloud Resource Manager API lets us manage those resources. Use the following command to enable both the APIs:-
gcloud services enable compute.googleapis.com cloudresourcemanager.googleapis.comNext, we need to create a service account for deploying resources to our project. A service account can be described as a special type of account that can authenticate on your behalf and deploy resources to your project using Google APIs with the privileges that you grant to it. So, instead of using your all powerful Google cloud account which can deploy almost anything, you’ll create an account with just enough privileges to deploy required resources and nothing more. To create a service account for Terraform use the following command:-
gcloud iam service-accounts create terraform --display-name "Terraform account"Next, create an authentication key for the service account that’ll be used by the service account to authenticate to GCP in order to create resources. Use the following command:-
gcloud iam service-accounts keys create ~/.config/gcloud/$PROJECT_ID.json --iam-account terraform@$PROJECT_ID.iam.gserviceaccount.comNext, provide a role to the Terraform service account to carry out the required tasks.
gcloud projects add-iam-policy-binding $PROJECT_ID --member serviceAccount:terraform@$PROJECT_ID.iam.gserviceaccount.com --role roles/owner
Note:- I’ve given a basic role of owner to the service account and in real life Enterprise environments you must be as restrictive as possible while providing roles to service accounts following the principle of least privilege. For more information on roles, refer official Google docs available here.
Next, create an environment variable pointing to the service account key you created above so that Terraform can use it to authenticate when creating resources. If your shell is zsh, then use the following command:-
echo 'export GOOGLE_APPLICATION_CREDENTIALS=~/.config/gcloud/$PROJECT_ID.json' >> ~/.zshrcOr, if your shell is bash, then use the following command:-
echo 'export GOOGLE_APPLICATION_CREDENTIALS=~/.config/gcloud/$PROJECT_ID.json' >> ~/.bashrcNext, to apply your changes, use the following commands depending whether you use bash or zsh. The last command is to check whether your variable was created or not.
source ~/.zshrc
source ~/.bashrc
echo $GOOGLE_APPLICATION_CREDENTIALS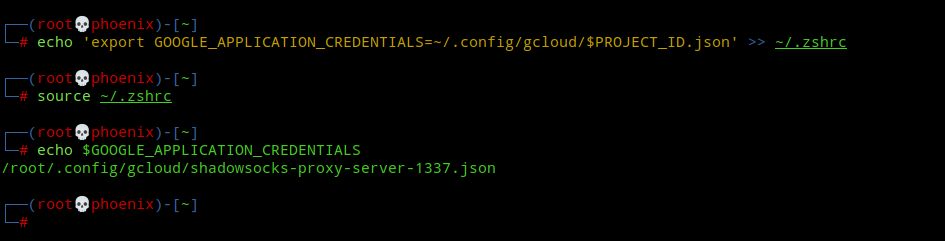
Install Terraform
To install Terraform, use the following commands:-
sudo apt-get update && sudo apt-get install -y gnupg software-properties-common curlcurl -fsSL https://apt.releases.hashicorp.com/gpg | sudo apt-key add -sudo apt-add-repository "deb [arch=amd64] https://apt.releases.hashicorp.com $(lsb_release -cs) main"For Kali Linux users only, the above command won’t work for you, instead you should use the following command:-
sudo apt-add-repository "deb [arch=amd64] https://apt.releases.hashicorp.com bookworm main"Next, install Terraform using the following command:-
sudo apt-get update && sudo apt-get install terraformTo enable tab completion for terraform commands, use the following command:-
terraform -install-autocompleteDeploy Shadowsocks server to GCP!
Clone my git repo for Terraform Shadowsocks config:-
git clone https://github.com/Xhoenix/tf-shadowsocks.gitNext, init Terraform to install the necessary providers plugins.
cd tf-shadowsocks
terraform init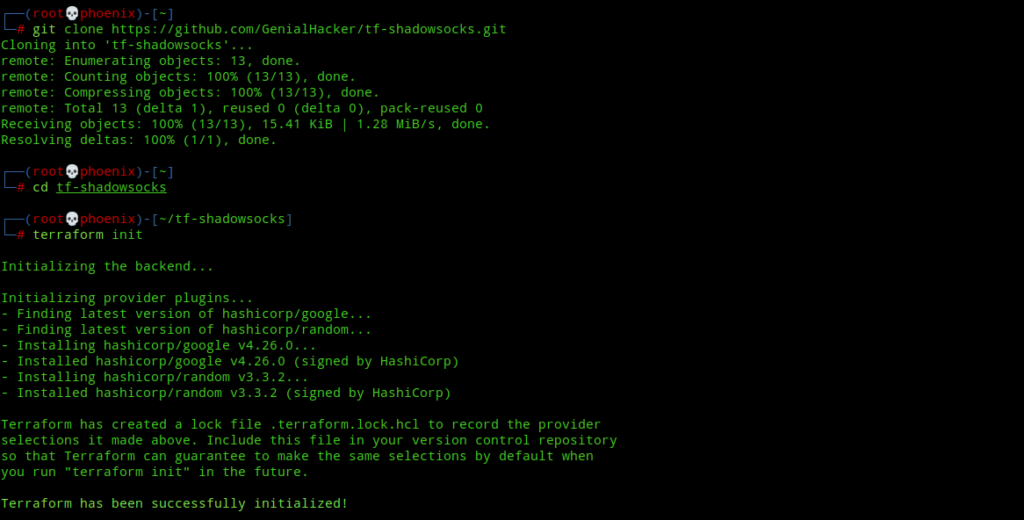
Next, create SSH keys for login into the shadowsocks server. Leave the keys at their default location, i.e ~/.ssh and if possible set a password for the keys. Note, if you’ve already created SSH keys, then ignore this step. If not, then create ssh keys using the following command:-
ssh-keygen -t rsa -b 4096Next, check the terraform config formatting and validate it using the following commands:-
terraform fmt
terraform validate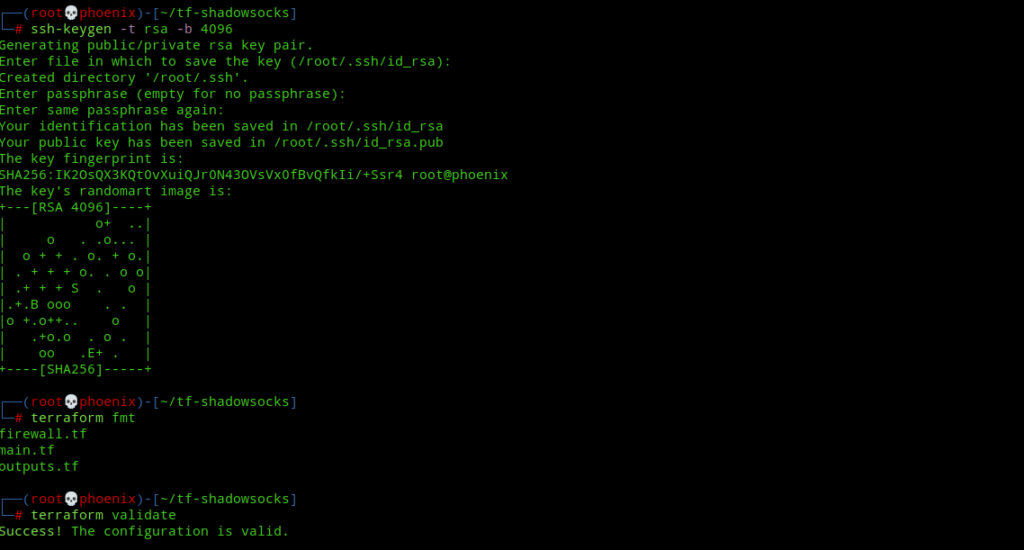
Next, type the greatest terraform command ever:-
terraform apply -auto-approveThe above command will take about 80-90 seconds to deploy your Shadowsocks server to GCP and when it is finished it will output your Shadowsocks server’s public IP address but the Shadowsocks server password would be hidden due to its sensitive nature.
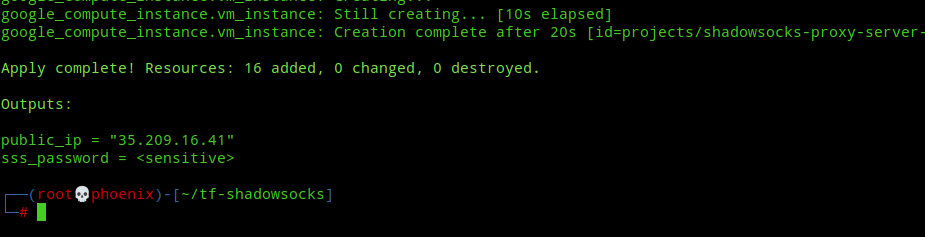
We need only two things to use our shadowsocks proxy client, i.e the shadowsocks server public ip address and the proxy server password. To show the password, type the following command:-
terraform output sss_passwordSetup Shadowsocks client in Linux
To install shadowsocks client use the following command:-
apt install shadowsocks-libevBy default Shadowsocks server is enabled when you install the above package. Next, stop and disable it using the following commands:-
systemctl stop shadowsocks-libev
systemctl disable shadowsocks-libev
The shadowsocks server and client binaries are called ss-server and ss-local. There is a systemd service template for the ss-local binary in /lib/systemd/system called shadowsocks-libev-local@.service but to use it we need to create a client configuration. To create a client configuration, copy the Shadowsocks server configuration using the following command:-
cp /etc/shadowsocks-libev/config.json /etc/shadowsocks-libev/gcp.jsonNext, open up /etc/shadowsocks-libev/gcp.json in your favourite commandline editor and set it to look something like this:-
 {
    "server":"your-server-ip-from-above-output",
    "mode":"tcp_and_udp",
    "local_address":"127.0.0.1",
    "server_port":8888,
    "local_port":1080,
    "password":"your-password-from-terraform-output",
    "timeout":86400,
    "method":"chacha20-ietf-poly1305"
}
It should look something like the image below:-
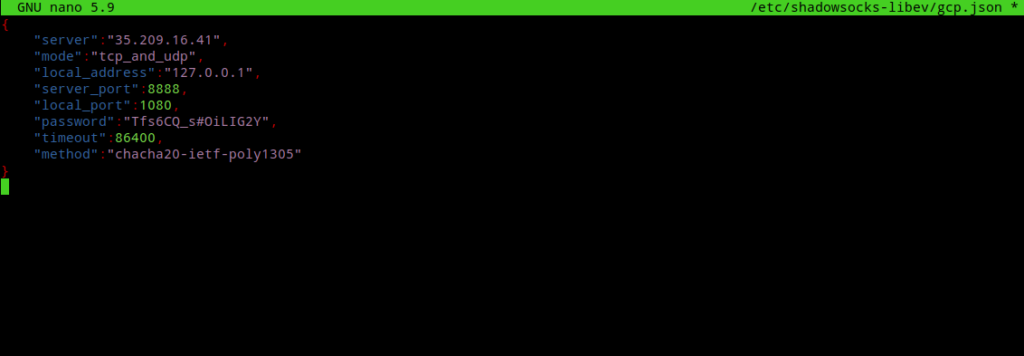
Note:- You’ve to add the "local_address":"127.0.0.1", line separately.
Next, start and enable the client to start at system startup with the following commands:-
systemctl start shadowsocks-libev-local@gcp.service
systemctl enable shadowsocks-libev-local@gcp.service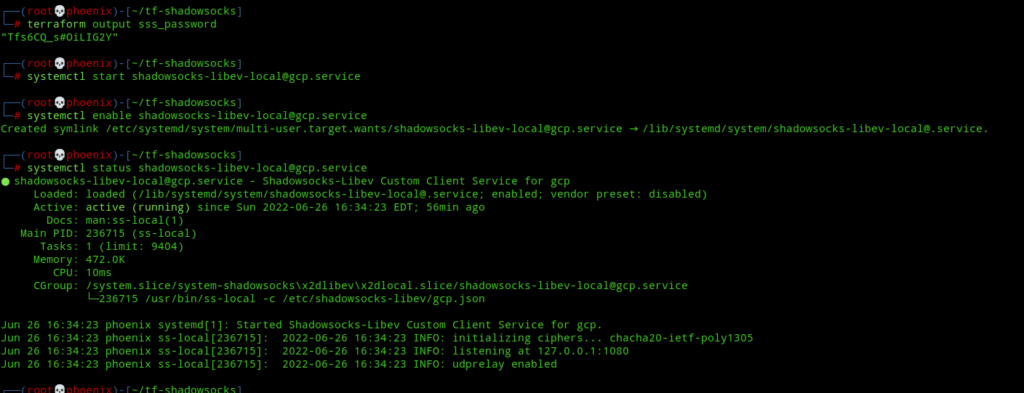
And now, your Shadowsocks client is fully ready and running and ss-local is listening on port 1080 on localhost. To check whether your proxy is working use the following command:-
curl --proxy socks5://127.0.0.1:1080 https://ifconfig.meThe above command should output your shadowsocks proxy server public IP address. If yes, then you’ve a full-fledged proxy server!

Now, if you somehow or someday want to get rid of the Shadowsocks proxy server, then you’ve to only type the following command:-
terraform destroy -auto-approveAnd to make sure you’re not billed for anything, you can even delete your project with this command:-
gcloud projects delete $PROJECT_IDHave a nice day!
Conclusion
So, that was how easy it is to deploy resources to Google cloud using Terraform. Terraform is super cool! It makes infrastructure deployment very easy and at the same time is very highly configurable. At this point I can even create an similar config for AWS easily without any problem. Maybe someday I’ll dive into the AWS world, but that day is not today as it is past three in the morning here and I’m writing this blog post. 🙂 Also, If you aren’t aware of this, then my terraform config comes with full IPV6 support and at this point you can even ssh into your server using your server’s external IPV6 address. Thanks for reading. Peace!